Zobrazují se příspěvky se štítkemJ2EE. Zobrazit všechny příspěvky

neděle 16. října 2011

Eclipse Indigo + Maven 3 + Tomcat debugging

I had a little hard time to see how to debug a Web project with Maven structure using Eclipse and build-in Tomcat debugging.

The problem is that Maven project has different structure thant Elicpses Dynamic Web Project, so finally eclipse does not know hot to package a WAR file and deploy it to the server.

Finally I found this blog, which explains the issue. This blog describes the situation when using Maven 2 and Eclipse Helios.

I use Maven 3 and Eclipse Indigo. When using Indigo, not all the steps described in the blog are needed (no changement of .project file needed). Basically you have to perform two steps.

1) Facets - change project nature. Go to the properties of the project and Project Facets and choose Dynamic Web Model. This step will change the structure of your project - add the WebContent folder.

2) Change the org.eclipse.wst.common.component file. This file is added when you have changed the project structure.

<?xml version="1.0" encoding="UTF-8"?>
<project-modules id="moduleCoreId" project-version="1.5.0">
<wb-module deploy-name="ProjectName">
<wb-resource deploy-path="/" source-path="/WebContent" tag="defaultRootSource"/>
<wb-resource deploy-path="/WEB-INF/classes" source-path="/src/main/java"/>
<wb-resource deploy-path="/" source-path="/src/main/webapp"/>
<wb-resource deploy-path="/WEB-INF/lib" source-path="/target/ProjecName/WEB-INF/lib"/>
<property name="context-root" value="ProjectName"/>
<property name="java-output-path" value="/ProjectName/target/classes"/>

</wb-module>
</project-modules>

What we need is to copy the everything we need into the WebContent directory. There are parts which you can copy directly from your project (jsp files, web.xml) and than parts which you have to copy from the Maven build output (libs, classes).

If you are lost, take a look at the mentioned blog.

středa 12. října 2011

Catalina - Life cycle exception

Last project: Tomcat and Java Web applicaiton.
Suddenly after just after adding some dependencies using Maven, I was not able to start the server. The exception did not give me much detaisl:
Grave: ContainerBase.addChild: start: 
org.apache.catalina.LifecycleException: Failed to start component [StandardEngine[Catalina].StandardHost[localhost].StandardContext[/Bank]]
at org.apache.catalina.util.LifecycleBase.start(LifecycleBase.java:152)

Caused by: org.apache.tomcat.util.bcel.classfile.ClassFormatException: Invalid byte tag in constant pool: 60
at org.apache.tomcat.util.bcel.classfile.Constant.readConstant(Constant.java:131)
at org.apache.tomcat.util.bcel.classfile.ConstantPool.(ConstantPool.java:60)

oct. 07, 2011 2:26:19 PM org.apache.catalina.startup.HostConfig deployDirectory

Grave: Erreur lors du déploiement du répertoire Bank de l'application web
java.lang.IllegalStateException: ContainerBase.addChild: start: org.apache.catalina.LifecycleException: Failed to start component [StandardEngine[Catalina].StandardHost[localhost].StandardContext[/Bank]]
at org.apache.catalina.core.ContainerBase.addChildInternal(ContainerBase.java:816)

So after checking the state of web.xml (no changes there) I started to take a look at te dependencies which I have added. Well actually I took a look at the JARs which were being donwloaded automatically by Maven.
I found out that when I added a dependency to Jaxen library, than several JARs war downloaded.

I started deleting one by one and redeploying, just to find out, that it was ICU4J.JAR which was causing the problem. Well I was sure that I did not need it, so I solved the problem by declaring Maven exclusion.

<dependency>
<groupid>jaxen</groupId>
  <artifactid>jaxen</artifactId>
  <version>1.1.1</version>
  <exclusions>
   <exclusion>
 <groupid>com.ibm.icu</groupId>
    <artifactid>icu4j</artifactId>
   </exclusion>
  </exclusions>
  <scope>runtime</scope>
</dependency>

Couriously enough I needed Jaxen in order to be able to use the Azure4Java tools and access to Azure table storage.


Still I do not understand the real cause of this problem, so if anyone finds similar issue, I hope this helps.

středa 23. února 2011

Spring MVC simple project (Spring by example)

This semester I had to do a bigger project using Spring Framework & Hibernate. On a side of this project I had a smaller one which I have created just to always try out certain parts which later I applied to the bigger one. Here I just present the simple project which should be easy to understand, but it contains all the important parts/frameworks/design patterns of enterprise applications: MVC, ORM, Validations, Security, Internalization, Views/ Tiles, Unit Tests.

I do not have much experience working with J2EE, or writing enterprise Java applications, so this will maybe help someone who is on the same Java level as I am.

Download the project here

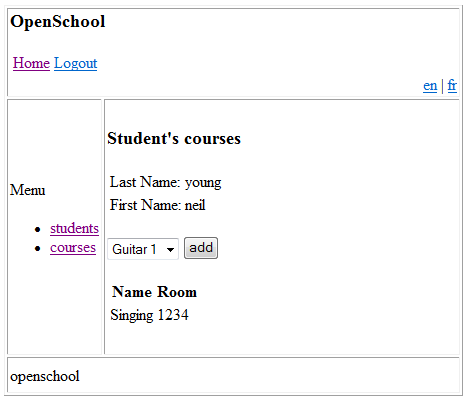
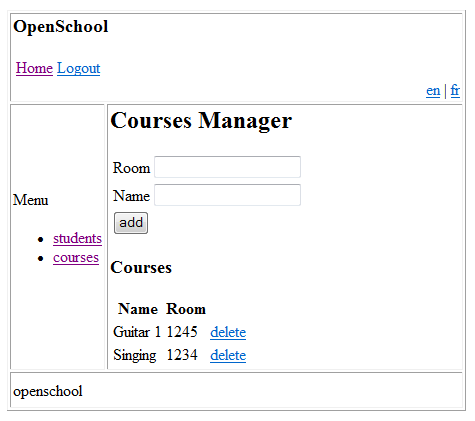
Now this is the resulting application:


You can see, that it is a basic application containing: Student and Courses. There is one Many To Many relationship, while each student can have many courses and each course can be followed by many students.

Basic setup of the project

This is Eclipse "Dynamic Web Application" Project. I have used the latest Eclipse 3.6, Java 1.6 and Tomcat 6. However this should not limit to run the project with different configurations, however changing to Java 1.5 would require some additional changes (@Override annotations).
In the following image you can see the two groups first the source files and second all the important configuration files. Here is brief overview:


  • web.xml - Web Deployment Descriptor, the base of the configuration for all the parts that compose the web application.
  • tiles.xml - Configuration of Appache Tiles - templating framework, used to define reutilisable parts of web pages.
  • spring-servlet.xml - Spring configuration part. Described lower.
  • jdbc.properties - This file just holds the properties of the database connection.
  • applicationContext-security.xml - Configuration of Spring Security Framework.

Package and project structure

The project has a common structure:
View <--> Controller <--> Service <--> Repository <--> DB.
The Repository pattern (implemented by the classes in the DAO package) allows the abstraction of the DB technology. The Service layer has implemented all the functions of the project. For example in the StudetsService class you can find all methods concerning the students (add a course to student, create new student..).
The Controller layer uses the Service layer to fill the model needed behind the view and to perform the tasks desired by the user.

Model View Controller with Spring

The MVC software architecture permits separate the domain model (M), the logic (C) and the user interface (V). Spring implementation of MVC is based on DispatcherServlet. DispatcherServlet is classical HttpServlet which decides to which Controller the current request should be sent and which View should be used to render the reponse.
Please refer to the Oficial Documentation which contains great explanation.
In the web.xml the DispatcherServlet is defined to handle all the requests coming to the web site (see url-pattern).
<servlet>
   <servlet-name>spring</servlet-name>
   <servlet-class>org.springframework.web.servlet.DispatcherServlet</servlet-class>
   <load-on-startup>1</load-on-startup>
  </servlet>
  <servlet-mapping>
   <servlet-name>spring</servlet-name>
   <url-pattern>/</url-pattern>
  </servlet-mapping>

  <context-param>
  <param-name>contextConfigLocation</param-name><param-value>/WEB-INF/spring-servlet.xml
   /WEB-INF/applicationContext-security.xml
  </param-value></context-param>
  
  <listener>
    <listener-class>org.springframework.web.context.ContextLoaderListener</listener-class>
  </listener>

In the servlet mapping part, the servlet-name is set to "spring". This servlet needs some special configuration and this will be provided by spring-servlet.xml file. But in order to tell Spring where to search te configuration we set the path of this file as the parametr to the Spring ContextLoader. There is also a link to the file which provides security configuration. Spring-servlet.xml contains a lot of configuration. Lets now take a look at the part concerning the view.


Apache Tiles

With spring you can use several APIs or technologies to build you user interface: standard JSP, Java Server Faces, Apache Tiles (they do not compete, they serve for different purposes and sometimes overlap). In this project I am using Apacha Tiles. That is a framework which allowes you to define a fragments or parts which can be reused in several web pages (typically for example you have a menu bar, which is always present).
In the Spring-servlet.xml this is the part concerning Tiles:
<bean class="org.springframework.web.servlet.view.UrlBasedViewResolver" id="viewResolver">
     <property name="viewClass">
         <value>
             org.springframework.web.servlet.view.tiles2.TilesView
         </value>
     </property>
 </bean>
 <bean class="org.springframework.web.servlet.view.tiles2.TilesConfigurer" id="tilesConfigurer">
     <property name="definitions">
         <list>
             <value>/WEB-INF/tiles.xml</value>
         </list>
     </property>
 </bean>

That tells Spring, that all the views should be resolved using TilesView class and the configuration can be found in the tiles.xml file.

Tiles Configuration

First declared in the Tiles configuration file is the layout. So a specific page(layout.jsp) which defines the layout of our pages and links to jsp pages which represent these parts. After this definition come the declarations of each view. Each view specifies which layout it uses and the parts which should be imported.
<tiles-definitions>
    <definition name="base.definition" template="/WEB-INF/jsp/layout.jsp">
        <put-attribute name="title" value="">
        <put-attribute name="header" value="/WEB-INF/jsp/header.jsp">
        <put-attribute name="menu" value="/WEB-INF/jsp/menu.jsp">
        <put-attribute name="body" value="">
        <put-attribute name="footer" value="/WEB-INF/jsp/footer.jsp">
    </put-attribute></put-attribute></put-attribute></put-attribute></put-attribute></definition>
 
    <definition extends="base.definition" name="students">
        <put-attribute name="title" value="Users management">
        <put-attribute name="body" value="/WEB-INF/jsp/students.jsp">
    </put-attribute></put-attribute></definition>
</tiles-definitions>

Take a look at the layout.jsp file and you will fast understand how it works.

MVC implementation

To understand how MVC works open one of the Controller classes, for example: StudentsController
@Controller
public class StudentsController {

 @Autowired
 private StudentsService studentsService;

 @RequestMapping("/students")
 public String listUsers(ModelMap model){
  model.addAttribute("student",new Student());
  List<student> users = studentsService.listStudents();
  model.addAttribute("studentsList",users);
  return "students";
 }
 
  @RequestMapping(value = "/addstudent", method = RequestMethod.POST)
    public String addContact(@ModelAttribute("student")
    Student user, BindingResult result) {
 
   studentsService.addStudent(user);
        return "redirect:/students";
    }
 
    @RequestMapping("/delete/{studentID}")
    public String deleteContact(@PathVariable("studentID")
    Integer studentID) {
     studentsService.removeStudent(studentID);
        return "redirect:/students";
    }
}
There is a private field of type StudentsService. You can see that it is annotated with @Autowired. This service provides all the methods needed to manipulate students. The @Autowire annotation tells Spring, that it should automatically instantiate this field from it's Dependency Injection container (in other words you do not have to take care about the creation of object).
Next there are 3 methods with different signatures all of them annotated with @RequestMapping. The MVC framework binds the URL given in the decoration with the controller and with the execution of the decorated method. In other words when the user navigates to "..TestingProject/students.do" this method will be processed to construct the Model and to return the View to the user.
As said before the methods have different signatures depending on their neeeds but the are some rules which have to be kept. (see the documentation).
The most straightforward is the method listStudents. This method fills the given Model (which is passed to the method by MVC framework) and returns the name of the view which should be used to show this model. You can take a look at the Tiles configuration to see which JSP will be shown after returning "students" as the name of the view.

Object Relational Mapping - the Domain

In the Domain package you can find just two classes: Student and Course. This is the Student class:
@Entity
@Table(name="student")
public class Student {

 @Id
 @GeneratedValue
 private Integer id;
 
 @ManyToMany
 @JoinTable(name="student_course"
  ,joinColumns=@JoinColumn(name="student_id")
  ,inverseJoinColumns=@JoinColumn(name="course_id"))
 private List follows;
 
 @Column
 private String firstname;
 
 @Column
 private String lastname;

 @Column
 private String email;
 
 @Column
 private Integer phone;
 public Integer getId() {
  return id;
 }
  ...getters and setters...
}
The @Entity annotation tells hibernate that this class represents and entity which should be stored in the database, the @Table annotation details the name of the table used to store these entities.
Each field of this class is annotated with @Column annotation - this tells Hibernate that each field should be persisted as separated column.
The @Id and @GeneratedValue annotations over the id field specify that this field represents the primary key and that the value of this key should be automatically generated whenever persisting a new entity in the table.
And last @ManyToMany and @JointTable annotations represent the N to N relationship between students and Courses. In common words Student can have several Courses and a Course can have several students.
The @JoinTable annotation specifies exactly which table should represents the N - N relation ship and declare the foreign keys in this table. Note that there are different ways to manage this using Hibernate (look for @ManyToMany and @MappedBy annotations).
The course class is quite similar and I will not describe it here.

Internalization / Localization

It is quite common demand to make the application supporting multipel languages. Spring framework provides LocalChangeInterceptor, which based on parametr in the url of the page decides, which languages version of the page should be loaded. To configure this feature take a look at the spring-servlet.xml file which contains the 3 following beans:

<!-- Messages and Internalization -->
    <bean id="messageSource"
        class="org.springframework.context.support.ReloadableResourceBundleMessageSource">
        <property name="basename" value="classpath:messages" />
        <property name="defaultEncoding" value="UTF-8" />
    </bean>
    
    <bean id="localeChangeInterceptor"
     class="org.springframework.web.servlet.i18n.LocaleChangeInterceptor">
        <property name="paramName" value="lang"/>
    </bean>
 
    <bean id="localeResolver"
   class="org.springframework.web.servlet.i18n.CookieLocaleResolver">
   <property name="defaultLocale" value="en"/>
    </bean>
The first bean defines the store for the strings in multiple languages. Here it aims at all files which look like "messages*" placed in the classpath, defining the UTF-8 as the default encoding to save the strings.
The second bean is the above mention language interceptor. The paramName property tells spring to look at the "lang" url parameter before composing the final web page.
The last bean defines which implementation of LocalResolver interface should be used to define the language. Here it is CookieLocalResolver. An implementation which uses a cookie sent to the user, which later can be retrieved to determine the language.
Now in the resources you can localize two files: messages_en.properties and messages_fr.properties. These two files contain a simple list of key-value pairs defining the strings used in the application and the translations.
Now the last step is to take a look in how these strings are references in the web pages. For that take a look for example at menu.jsp which defines the left side menu of the application.
<%@taglib uri="http://www.springframework.org/tags" prefix="spring"%>
<p><spring:message code="label.menu"/></p><ul><li><a href="/TestingProject/students"><spring:message code="label.students"/></a></li>
<li><a href="/TestingProject/courses"><spring:message code="label.courses"/></a></li>
</ul>

Here you can see that instead of writing the string inside of the A tag, the spring:message tag is used which loads the correct string identified by the "label.students" key.

Security

Now the security is taken care of by Spring Security (former Acegi Security) framework and I use the very basic settings. Spring Security in its core uses basic Filter and FilterChain interfaces which are defined in the core of Java Servlet application and are generally code parts responsible for composing or caching the content to be send to the user.
In the web.xml file the following parts instruct the application to use the org.springframework.web.filter.DelegatingFilterProxy class for filtering all url (pattern set in the filter-mapping part). This filter is later responsible for allowing access to certain parts only to users with certain rights. To get more information refer to this official "The Security Filter Chain" page.. For more information about filters in general visit this page..
The first part of the security settings is defined in separated applicationContext-security.xml file.
First the following authentication-manager tells spring that the user is authentified against the database. The same data source is already used for ORM mapping.
<authentication-manager>
  <authentication-provider>
    <jdbc-user-service data-source-ref="dataSource"/>
  </authentication-provider>
</authentication-manager>

However the precedent snippet does not define how the security data is stored in the database. That is because it uses the default implementation. In other words Spring expects you to provide the data source with default structure. This structure is composed of two tables: users and authorities. To see the details take a look at the Apendix A of Spring documentation. And if you just want to have the DB structure you can create it with security_db.sql script which is part of the project:
create table users(
      username varchar(50) not null primary key,
      password varchar(50) not null,
      enabled boolean not null);

  create table authorities (
      username varchar(50) not null,
      authority varchar(50) not null,
      constraint fk_authorities_users foreign key(username) references users(username));
      create unique index ix_auth_username on authorities (username,authority);

So we have the users which have roles and the data is stored in the database. Now the way it is used is specified in the second part of "applicationContext-security.xml".
<http auto-config="true">
        <intercept-url pattern="/admin/*.do" access="ROLE_ADMIN"/>
        <intercept-url pattern="/**" access="ROLE_USER,ROLE_ADMIN,ROLE_TEACHER"/>
        <intercept-url pattern="/login.jsp*" filters="none"/>
        <form-login login-page='/login.jsp'/>
</http>
Here we assign to url patterns the roles that users need to have in order to access these urls.
Well that's it. But this is just a very simple way of implementing security. There are more advanced manners of securing the method calls or visibility of html elements always based on user roles.

Hints for the other aspects enterprise application

Unfortunately I did not have time to include in this simple project some other aspects of enterprise applications.

Validations

To implement data validations spring contains org.springframework.validation space, which contains a Validator interface containing "validate" method. Here is a short example of how validator could be implemented for a "User" class:
public class UserValidator implements Validator {
  
 @Override
 public boolean supports(Class arg0) {
  return User.class.isAssignableFrom(arg0);
 }

 @Override
 public void validate(Object arg0, Errors arg1) {
  User user = (User) arg0;
  if(!isValidEmailAddress(user.getAdresse_mail())){
   arg1.rejectValue("adresse_mail","adresse_mail.notValid","Not a valid email");
  }
  
 }
 
 public boolean isValidEmailAddress(String emailAddress){  
     String  expression="^[\\w\\-]([\\.\\w])+[\\w]+@([\\w\\-]+\\.)+[A-Z]{2,4}$";  
     CharSequence inputStr = emailAddress;
     Pattern pattern = Pattern.compile(expression,Pattern.CASE_INSENSITIVE);  
     Matcher matcher = pattern.matcher(inputStr);  
     return matcher.matches();
   } 
}
In this example I am using Regular Expressions to determine whether the specified email is in valid form.
Another way of validating would be to use the JSR 303 validation specification, which defines the validation model based on annotations. This allows you to annotate field of you domain class and thus specify the way this field should look like. In the following example the @Email annotation would take care of what the above implementation does.

public class User {

@Email
protected String adresse_mail;

@Basic
@Column(length=50)
public String getAdresse_mail() {
 return adresse_mail;
}
public void setAdresse_mail(String adresse_mail) {
 this.adresse_mail = adresse_mail;
}
}
However there are cases where you will always like to implement your own validators. For example when you want to reach to the database and decided whether there is not already a user with a given name, or whether the student is not already signed in specified class.
To get more information about JSR 303 validation refer to this blog post.

Advanced Security Approaches

When working on our application I was having hard time to find out how to force Spring Security to you my own database model and perform the authentication my way. I found that the easiest way was to implement UserDetailsService interface. This interface contains one method called: loadUserByUsername which returns UserDetails class, also defined by Spring. This class should contain the user information. So basically its up to you to implement this method that way, that you will give it the user name and it will return filled UserDetails class containing users password and users roles. Here is a simple implementation:

@Service("userDetailsService") 
public class UserDetailsServiceImpl implements UserDetailsService {

  @Autowired
  private UsersDAO usersDAO;

  @Transactional(readOnly = true)
  public UserDetails loadUserByUsername(String username)
      throws UsernameNotFoundException, DataAccessException {

    User user = usersDAO.findByLogin(username);
    
    if (user == null)
      throw new UsernameNotFoundException("user not found");

    Collection authorities = new ArrayList();
    for (openschool.domain.model.Role role : user.getRoles()) {
      authorities.add(new GrantedAuthorityImpl(role.getRole()));
    }
    
    String password = user.getPassword();
    boolean enabled = user.isEnabled();
    boolean accountNonExpired = true;
    boolean credentialsNonExpired = true;
    boolean accountNonLocked = true;
    
    
    org.springframework.security.core.userdetails.User springUser;
    springUser = new User(username, password, enabled, accountNonExpired, credentialsNonExpired, accountNonLocked, authorities);
    
    return springUser;
  }
}

Unit Tests

When using Spring IOC you need to tell to spring what is the application context for the unit tests. Normally the application context is specified by the web.xml file. But the Unit Tests do not have anything together with the web application, so you have to tell to Spring where to find all the definitions in order to wire all you injected objects.
This can be done by annotating the UnitTest class by following annotations:
@RunWith(SpringJUnit4ClassRunner.class)
@ContextConfiguration(locations={"classpath:/applicationContext.xml"})
The ContextConfiguration annotations provides the information to spring where to find the configuration xml. Here it points to the applicationContext.xml on the classpath. Just two provide some information on how the complete test class can look:

@RunWith(SpringJUnit4ClassRunner.class)
@ContextConfiguration(locations={"classpath:/applicationContext.xml"})
public class UsersDAOTest{

 @Autowired
 UsersDAO usersDao;
 
 private Long beforeUserID;
 
 @Before
 @Transactional
 public void initDB(){
  Administratif user = new Administratif();
  user.setLastName("User_before");
  user.setAdresse_mail("email@email.com");
  user.setLogin("login");
  
  
  usersDao.addUser(user);
  beforeUserID = user.getIdUser();
 }
 
 @Test
 @Transactional
 public void testAddUser() {
  
  User user = new User();
  user.setLastName("Lastname");
  user.setAdresse_mail("email@email.com");
  
  usersDao.addUser(user);
  
  User user2 = usersDao.getUser(user.getIdUser());
  assertEquals(user, user2); 
       }
You might also want to create Test Suites which allow to run multiple tests in the same time, by creating simple class with @Suite annotation:
@RunWith(Suite.class)
@Suite.SuiteClasses({
 MyTest1.class,
 UsersDAOTest.class,
 MyTest2.class
})
public class TestSuite {
  //intentionally empty
}

čtvrtek 29. července 2010

J2EE - NetBeans, JSF, Persistence API - Part 3

This blog entry is a continuation of a series in which I try to show how I taught myself the basics of J2EE. You can see the first part and following second part.
The aim of this part is to extend the detail page of a company by adding a list of products of the company and a drop down list box, which will allow a user to add a new product to the list of the products of the company. Here is who it should look like in the end.

Generally adding the list of the products of the company to the page will be a piece of cake. You can again use the dataTable component provided by JSF. What will be a bit tricky is adding a drop down list. We will use the selectOnListBox component populated by List. Because this component allows to show String value and as I seed we will put in Product class. We will have to use a Converter component which will translate the Product to a single String and vice versa.

Changes to the Session Bean


Again here I will start with the changes in the lower level. We will need to add a method which will provide all the products in the database as a List object. Later we will populate a drop down list with these products.
public List<product> getAllProducts() {
 List<product> products = em.createNamedQuery("Product.getAllProducts").getResultList();
return products;
}

This method is calling a named query which you need to place above the "Product" class declaration.
@Entity
@NamedQuery(name="Product.getAllProducts",query="SELECT p FROM Product p")
public class Product implements Serializable {

}

Then we will need a method which will find a product for a given ID. We can easily use u method of the Entity Manager which allows to find o object by a given ID (the ID field is decorated as a identity in the Entity Beans declaration. This method will be used by the Converter class.
public Product getProductWithId(String id) {
try {
  return em.find(Product.class, Integer.parseInt(id));
} catch (java.lang.NumberFormatException e) {
  e.printStackTrace();
}
return null;
}

The converter class


As it had been said already, we will implement class which allows us convert object of type Product to a String. This class has to implement Converter interface, provided by the JSF framework. This interface has two methods which have to be overriden getAsObject and getAsString. Both of these methods do have 3 arguments.

The FacesContext specifies the context of the current request. FacesContext is an object which takes care of all the phases needed to render a response to the request. When an user demands an page, the users request is first processed by the Faces Servlet. If the call is a postback of previously viewed page, Faces Servlet will use the ID of the view and will look up the FacesContext of the page. If it is a initial view of the page, new FacesContext will be created. FacesContext connects the Component Tree of your page with the Backing Bean containing the logic. To get more information about the JSF life cycle and the FacesContext visit this series.. Now the second argument is the UI Component to which the Converter is connected and the 3rd argument is either String value or Object - depends which way are you currently converting. Now - you just have to implement these method, you will probably never call them in your code. Here is my ProductConverter class which I decided to put into package sales.util.
public class ProductConverter implements Converter{
public Object getAsObject(FacesContext context, UIComponent component, String value) {
SalesSessionLocal ssb = lookupSessionBean();
Product p = ssb.getProductWithId(value);
return p;
}

public String getAsString(FacesContext context, UIComponent component, Object value) {
String id = String.valueOf(((Product)value).getId());
return id;
}

private SalesSessionLocal lookupSessionBean(){
try{
Context c = new InitialContext();
SalesSessionLocal ssb = (SalesSessionLocal) c.lookup("java:comp/env/SalesSessionBean");
return ssb;
}catch(NamingException ex){
return null;
}
}
}

The conversion of the object to the String is quite easy - you just need to decide what describes the object. Here you can see that I just return the products ID.
The conversion of an String to object is the processing of looking up the product of given ID in our Entity Manager. We had prepared a method for this lookup in the Sesion Bean, which we are basically calling by the following line.
Product p = ssb.getProductWithId(value);

Now the question is how to obtain the Session Bean. Normally in the Backing Bean we are using the EJB injection by the "@EJB" decoration. This means that we just write one single line and we obtain the Session Bean (no initialization, the framework takes care of this).
@EJB
SalesSessionLocal ssl;

However in the Converter you are not able to use this approach. The injection is allowed just in Managed Beans (another name for Backing Beans). The solution here is the usage of JNDI Lookup. JNDI - in general is a standard JAVA interface of locating users, computers but also objects and services. We need to lookup an object, concretely Session Bean, which is a part of the same J2EE application. The details of this lookup can be found here. Generally when the application server is started it creates for each application and InitialContext, which is an object that contains the Name - Object bindings. Using this InitialContext we can obtain the desired object if we know the name the object. We give the name to the object (Sesstion Bean) when we register it in the web.xml configuration file. Here is the registration of EJB in web.xml.
<ejb-local-ref>
<ejb-ref-name>SalesSessionBean</ejb-ref-name>
<ejb-ref-type>Session</ejb-ref-type>
<local>sales.SalesSessionLocal</local>
<ejb-link>SalesManagement-ejb.jar#SalesSessionBean</ejb-link>
</ejb-local-ref>

And Here is how we can use the JNDI Lookup to get the Sesstion Bean in our GlassFish InitialContext.
Context c = new InitialContext();
SalesSessionLocal ssb = (SalesSessionLocal) c.lookup("java:comp/env/SalesSessionBean");

Changing Faces Configuration


So that's it, the Convertor class is ready to be used. Now we have to register it in the Faces Configuration; in the faces-config.xml file add the following:
<converter>
<description>Converts Product Entity to String</description>
<converter-id>ProductConverter</converter-id>
<converter-class>sales.util.ProductConverter</converter-class>
</converter>

Changes to the Managed Bean (another name for Backing Bean)


Now we will have to add some methods and fields to the Backing Bean to assure the functionality. First we will need to provide a field (and off course setters and getters) which will store the actual selected "Product" in the drop down list.
private Product selectedProduct;
public Product getSelectedProduct() {
return selectedProduct;
}

public void setSelectedProduct(Product selectedProduct) {
this.selectedProduct = selectedProduct;
}

Now the next method called "addProduct" will just add the "selectedProduct" to the list of products of the current company.
public void addProduct(){
if(this.company.getProducts() == null){
this.company.setProducts(new ArrayList());
}
this.company.getProducts().add(selectedProduct);
ssl.saveCompany(company);
}

The latest method will return a collection of products in as a list of SelectItem, which will represent the collection of products in the drop down list. This method benefits from the previously created method for getting all products in the Session Bean.
public List getAllProductsSelectList() {
List items = new ArrayList();
for (Product p : ssl.getAllProducts()) {
items.add(new SelectItem(p, p.getId() + " " + p.getName()));
}
return items;
}

Using the converter in the web page


Now you should be ready to use to converter in your web page. Open the page with the details of the company ("company.jsp" in my case), and add the following table of products of one company.
<h:datatable value="#{sales.company.products}" var="item">
<h:column>
<f:facet name="header"><h:outputtext value="Name"></h:outputtext></f:facet>
<h:outputtext value="#{item.name}">
</h:outputtext></h:column>
<h:column>
<f:facet name="header"><h:outputtext value="Description"></h:outputtext></f:facet>
<h:outputtext value="#{item.description}">
</h:outputtext></h:column>
</h:datatable>
That is basically the same as done before in part 1, just notices that the table is binded to the list of the products of the "Company" object in Backing Bean. Now the following peace of code actually adds the drop down list box, which allows user to select one product and add it to the company.
<h:outputtext value="Add Product:"></h:outputtext></h3>
<h:selectonelistbox size="1" value="#{sales.selectedProduct}">
<f:selectitems value="#{sales.allProductsSelectList}">
<f:converter converterid="ProductConverter">
</f:converter></f:selectitems></h:selectonelistbox>
<h:commandbutton action="#{sales.addProduct}" id="btnAdd" value="Add">
</h:commandbutton>

You can see that the selectOneListbox component is binded to the "selectedProduct" field defined in the Backing Bean as well as the items list is binded to the list of products in the Backing Bean. The component also contains reference to the converter which should be used, which we have before prepared in the faces-config.xml. If you try this example right now, it will not work, instead you will obtain a strange validation error in your GlassFish log.
To be used by custom JSF converter, the entity class needs to override the Equals method. This is because the selected item is binded to the Backing Bean and when the selected item changes, it is compared to the binded field in the Backing Bean. So now you have to override the equals method for your "Product" class. To distinguish two products you can simply compare their IDs.
@Override
public boolean equals(Object obj){
  if (obj == null) {
    return false;
  }
  if (getClass() != obj.getClass()) {
     return false;
}

final Product other = (Product) obj;
if (this.getId() != other.getId()) {
return false;
}
return true;
}

To try out your example you need some simple testing data. You can run this script (just check the names of the fields in the database tables before).
INSERT INTO SALES.COMPANY (companyname, companydescription) values('First company', 'Sales bananas');
INSERT INTO SALES.COMPANY (companyname, companydescription) values('Second company', 'Sales oranges');

INSERT INTO SALES.PRODUCT (productname,productdescription) values ('Product 1','Orange');
INSERT INTO SALES.PRODUCT (productname,productdescription) values ('Product 2','Banana');
DOWNLOAD THE SOURCE CODE
PART 1
PART 2
PART 3

pátek 16. července 2010

J2EE - NetBeans, JSF, Persistence API - 2nd Part

In the first part I described how to develop a simple page which shows all the "companies" stored in the company table. Now I would like to describe how to add some additional functions - create new company, edit company's details. If you are interested take a look at the first part or directly download the source code.

Class diagram and actual state

Here is our class diagram.

And here the page with some with table containing 2 companies.

What we will add


Now I will add a button to each row of the table, which will direct the page to a site where the user could edit the company details and a second button which will allow creating a new company. Before creating web pages again I will start with defining methods which we will need in Session Beans (the lowest layer) and additional methods and fields in Backing Beans (the middle layer).

New methods in Session Beans


In the Session Bean I will add a method called "saveCompany".
public void saveCompany(Company company) {
company = em.merge(company);
em.persist(company);
}

This method will take an instance of "Company" object and will perform a "merge" of this object with object in Persistence Context. If there is already object distinguished by the same ID in the Persistence Context, than the Entity Manager will update the state of the object in Persistence Context. If there is no such a object than a new one will be created (or lets say the new Company will be added to the Persistence Context. Than by calling the "persist" method of Entity Manager the Company will be stored in the database.

Changes in Backing Bean


Now the Backing Bean will need some more changes. I will add a field of type "Company" which will represent a Company which is actually showed or edited. Than instead of using a basic collection of type List I will use a class called DataModel, which is a part of JSF Framework and allows me to get the row selected by the user in the GUI.
public DataModel companiesModel;
private Company company;
public DataModel getCompaniesModel(){
companiesModel = new ListDataModel(getAllCompanies());
return companiesModel;
}

Now when I have the model I am able to get Company object representing the actually selected row. This is show in method "editCompany".

You see that the method returns String, concretely "edit-company". That string represents a name of a navigation rule which will be used by JSF Framework. Basically it means that the user will be redirected to another page which is specified in the faces-config.xml file. That I will show later. First let me put the last 2 new methods in Backing Bean, one for saving and one for creating a new company. Again the methods return String values for navigation purposes, it will all be clear soon :).
public String saveCompany(){
  ssl.saveCompany(company);
  return "show-companies";
}

public String newCompany(){
  company = new Company();
  return "edit-company";
}

New JSF Page to show Company's details


Lets create a new JSF JSP page (On the Web Module -> New -> JSF JSP) and call it "company.jsp". This page will be used to specify the company details. The code is quite simple:
<h1><h:outputText value="Company Details:"/></h1>
<h:panelGrid columns="2">
<h:outputText value="Name"/>
<h:inputText value="#{sales.company.name}"/>
<h:outputText value="Description"/>
<h:inputText value="#{sales.company.description}"/>
</h:panelGrid>
<h:commandButton id="btnSave" action="#{sales.saveCompany}" value="Save"/>
</h:form>

You see that it uses the h:form tag. This tag is basically later rendered as HTML form tag. This TAG has to be present if your page contains buttons or other components that perform some action. You see that the action of a button is binded to the "saveCompany" method of our Backing Bean and the value of the input fields are binded to the "company" members again in the Backing Bean.

Changes to page containing table of companies


Now lets do some changes to the "companies.jsp" page - the page containing the table of all companies. I will add a "Edit" button to each row (by defining a new column) and in the bottom of the page I will add a "New" button. Both of these buttons will use method previously defined in the Backing Bean.
<h:form>
<h1><h:outputText value="Companies List"/></h1>
<h:dataTable value="#{sales.companiesModel}" var="item">
<h:column>
<f:facet name="header"><h:outputText value="Name"/></f:facet>
<h:outputText value="#{item.name}"/>
</h:column>
<h:column>
<f:facet name="header"><h:outputText value="Description"/></f:facet>
<h:outputText value="#{item.description}"/>
</h:column>
<h:column>
<h:commandButton id="btnEdit" action="#{sales.editCompany}" value="Edit"/>
</h:column>
</h:dataTable>
<h:commandButton id="btnNew" action="#{sales.newCompany}" value="New"/>
</h:form>

Notice, that because there are buttons performing actions I had to surround the whole table by h:form tag.

Changes to faces-config.xml


OK - now we have the pages, last step missing is to explain the navigation rules. As I said before these rules are managed by JSF Framework, and are "called" by returning string expression of our Backing Beans methods (editCompany, saveCompany, newCompany). Open the file "faces-config.xml" and in the upper tab select "Page Flow". You will see a diagram of your pages (there should be 3 of them: companies.jsp, company.jsp, index.jsp). Edit the "Page Flow diagram so it will resemble the following one.

You can change the view to XML and see the XML declaration of these rules (the Page Flow diagram is there just to visualize the navigation rules.
<navigation-rule>
<from-view-id>/companies.jsp</from-view-id>
<navigation-case>
<from-outcome>edit-company</from-outcome>
<to-view-id>/company.jsp</to-view-id>
</navigation-case>
</navigation-rule>
<navigation-rule>
<from-view-id>/company.jsp</from-view-id>
<navigation-case>
<from-outcome>show-companies</from-outcome>
<to-view-id>/companies.jsp</to-view-id>
</navigation-case>
</navigation-rule>

OK now you should be ready to start try out the project. In the "index.jsp" page I added redirect from index page to "companies.jsp" - so you do not have to type the address and it just gets opened after running the project in NetBeans.


PART 1
PART 2
PART 3

středa 14. července 2010

J2EE - NetBeans, JSF, Persistence API

UPDATE:

This is a very old article from the times, when I was very new to Java world. Nowadays I would probably not recomend looking into JSF and J2EE, but it can serve well someone who decided for these technologies and wants to get started.

I spend most of my time with .NET technologies, but I am aware of that J2EE is very powerful and number one technology in the enterprise application world, so I decided that I should learn some basics of J2EE.

You can download the source code here. The source code contains already implemented the changes described in the second part of this post.

This is a simple tutorial on "How to build simple enterprise web application on top of DB" using Java Persistence API, JSF, NetBeans and Derby Database. We will create application that allows the management of "Companies and their Products".

First you will need:


-> NetBeans 6.7.1 + UML tools. I used 6.7.1 because it supported the UML modelling tools with reverse engineer and code generation. The package was not so far ported for the newer versions of NetBeans.
-> J2EE
-> Application server - I used GlassFish 2.1
-> Derby Database (Java DB is SUN's version of this Open Source database)

You can just download the NetBeans Bundle which already includes everything. Just keep in mind that it was tested on the 6.7.1/GlassFish 2.1 version and some setting might not work on the newer versions.

Technologies & Recommended Reading


Java Persistence API - will help us with Object Relational Mapping - it will transfer the Java Objects to the tables in the database.
Entity Bean - represents the object (Company, Product) and its fields (Name, Description) which are later represented as columns in data table.
Session Bean - rather represents all the actions which can be done with the Entity Beans (Create new product, List products of company...)
JSF - web application framework used to speedup an ease the GUI creation. I use the 1.2 version, which is build on top of JSP (a lower layer technology for building dynamic web apps).

Create the projects


In NetBeans select New -> New Project -> Java EE -> Enterprise Application. Later you will be asked to specify Application Server, here you can select the installed GlassFish instance.

In the last tab you can specify the names for the EJB and Web Application Module. That is because NetBeans will create two modules. The EJB module will take care of your "Model and Control", the Web Application Module will take care of the "View".

If you wish to model you Entity Beans with NetBeans UML tool than select New Project -> UML -> Java-Platform Model -> Finish, and later you can create your Class Diagram.

Start with modelling


First we want to create our Entity Beans - objects which represent some real world entities, which will be stored in the database. In our application there are 2: Company and Product. Here is the class diagram which we want to create.


From this diagram we can generate the Entity classes. Right click the UML project -> Generate Code. You should obtain following classes:
public class Company {

private int id;
private String description;
private String name;
private List products;

public Company () {
}

public int getId () {
return id;
}

public void setId (int val) {
id = val;
}

public String getName () {
return name;
}

public void setName (String val) {
name = val;
}

public List getProducts() {
return products;
}

public void setProducts(List products) {
this.products = products;
}

public String getDescription () {
return description;
}

public void setDescription (String val) {
this.description = val;
}
}

public class Product {

private int id;
private String description;
private String name;

public Product () {
}

public String getDescription () {
return description;
}

public void setDescription (String val) {
description = val;
}

public int getId () {
return id;
}

public void setId (int val) {
id = val;
}

public String getName () {
return name;
}

public void setName (String val) {
name = val;
}
}


Also you can write the classes and use the Reverse Engineer to obtain the class diagram.

Creating Entity Beans from classes


To convert the the class to Entity Beans you have to do two simple steps - add annotations and implement the Serializable interface.

public class Company implements Serializable {

@Id
@GeneratedValue(strategy=GenerationType.IDENTITY)
@Column(name="companyID",nullable=false)
private int id;

@Column(name="companyDescription")
private String description;

@Column(name="companyName")
private String name;

@ManyToMany
private List products;

...and all the setters and getter...
}


It is quite self-explanatory. The class has to be annotated as @Entity, and has to have at least one @Id field. Then we can specify the name of the column which will be created in the database, and also strategy for generating the IDs value.

You will notice that there will the NetBeans light bulb telling you that there is no Persistence Unit - now we will create one.


Creating the Persistence Unit


Persistence Unit will perform the object - relational mapping for us. To create one we will first create a database.
On the "Services" pane localize Databases -> Java DB -> Create Database and specify the demanded details.

Now when we have the Database, we can create Database Connection which will be used by the Persistence Unit to connect to the DB.
Databases -> New Connection.


Now go back and right click EJB Module of you application and select New -> Persistence Unit.


Before we continue with Session Beans we will prepare a Named Query. Named queries are static queries which are later compiled to SQL and used by Persistence Unit. We will use a simple queries getting all the companies in the table. We place the query above the class definition.

@Entity
@NamedQuery(
name="Company.getAllCompanies",
query="SELECT c FROM Company c"
)
public class Company implements Serializable {

}


Now that you have finished the Persistance Unit you can try to deploy the project. Of course there is no functionality so far created, but during the deployment the database should be created for you. You can check the resulted database in the Services tab.

Session Beans


Now we will create the Session Bean, which will provide method and actions which we can perform with our Entity Beans.
Go to Enterprise Beans -> New -> Session Bean, than specify the package and leave the standard settings.

You can notice that the newly created Bean implements interface ending with "Local".
Now we will add the first method which will return all the companies in the database. NetBeans tells you how to do this - Context Menu -> Insert Code -> Add Bussiness Method.


The method will be defined in the interface and method stub created in the implementation. Now you can edit the code like this:

@Stateless
public class SalesSessionBean implements SalesSessionLocal {

@PersistenceContext
private EntityManager em;

public List getAllCompanies() {
List companies = em.createNamedQuery("Company.getAllCompanies").getResultList();
return companies;
}
}


Notice that we defined EntityManager which is a class which manages Persistance Context. Persistance Context is basket managing your Entities(objects representing Company, Product...). Classes which are managed by the Entity Manager are our Entity Beans. In the method you can see that we all calling Named Query which we have created before.

Backing Beans


Now we will create a middle layer between the Session Bean and JSP site representing the GUI - this layer is a Backing Bean. Backing bean is a Java class which manages and is accessible from the actual JSP page. Create new class in the Web Module (New -> Java Class) and name it SalesBack. Now here is the implementation:

public class SalesBack {

@EJB
SalesSessionLocal ssl;

public List<company> getAllCompanies(){
return ssl.getAllCompanies();
}
}


You can see that the class basically references the Session Bean (Be careful you have to reference the interface, not the actual implementation). Than in the method we simply calling the method of the Session Bean. From this it seems that this layer is not needed, but actually it is quiet helpful as you will see later.

Faces configuration


In order to be able to use just create Backing Bean in your JSP pages, you will need to perform some changes to faces-config.xml file. Open the file and add the following into the faces-config element:

<managed-bean>
<managed-bean-name>sales</managed-bean-name>
<managed-bean-class>sales.back.SalesBack</managed-bean-class>
<managed-bean-scope>session</managed-bean-scope>
</managed-bean>

Be sure to check the Backing Bean class (including the package name). Later you can reference this Backing Bean as "sales" in your JSP page.

JSF Page


Now we will show what advantages/components brings Java Server Faces and how to use them. First we will create simple page just showing a table of all companies in stored in the DB. On the Web Module create a new JSP page with JSF. (New -> JSF JSP Page). After you create the page you can see that it contains two @taglib directives referencing the JSF framework TAGs.
JSP technology can be extended by "custom tags". When we register the prefixes using the taglib directory, we introduce all the custom tags which come with the JSF framework. First group with prefix "f" named "Core" references all the components which are independent on the renderer (e.g. converters, validators). The second group with prefix "h" named "HTML" introduces all the HTML tags and components that brings JSF to create nice GUI and functional GUI (buttons, tables, grids...).
OK, so now lets put in the code which will show the table of companies.
<h1><h:outputText value="Companies List"/></h1><h:dataTable value="#{sales.allCompanies}" var="item">
<h:column>
<f:facet name="header"><h:outputText value="Name"/></f:facet>
<h:outputText value="#{item.name}"/>
</h:column>
<h:column>
<f:facet name="header"><h:outputText value="Description"/></f:facet>
<h:outputText value="#{item.description}"/>
</h:column>
</h:dataTable>


The main advantage of JSF is that it lets us bind the content of some HTML components to the properties/fields in the Backing Bean. Because in our Backing Bean we had a method called "getAllCompanies" than here we can reference the result of this method as "#{sales.allCompanies}". This binding is done on the "" component by setting the value attribute. Notice that the second attribute var lets you set the "name" for one row of the binded collection. Later in the columns definitions you can address one company in the collection by this name (here "item").

Faces Servlet configuration in web.xml


Ok now that you have created the JSP file is time to try it. Before you will have to tell the application server, that if the user navigates to your page, the page contains Faces elements and has to be processed using the Faces Servlet. Open the web.xml and alter the Faces Servlet settings this way:

<servlet>
<servlet-name>Faces Servlet</servlet-name>
<servlet-class>javax.faces.webapp.FacesServlet</servlet-class>
<load-on-startup>1</load-on-startup>
</servlet>
<servlet-mapping>
<servlet-name>Faces Servlet</servlet-name>
<url-pattern>*.jsf</url-pattern>
</servlet-mapping>


Important part is the Mapping configuration. Basically you are saying that each file ending jsf will be processed by the Faces Servlet. Now if the name of the file you created was "companies.jsp", than in the browser you will reference it by "companies.jsf". Now run the project, and in the browser type the path to "companies.jsf" and you should get following result.


Obviously the companies table is empty. So go ahead and using NetBeans (Services -> Databases) run some SQL INSERT statements and you should be able to see the inserted data in your table.

INSERT INTO SALES.COMPANY (companyname, companydescription) values('First company', 'Sales bananas');
INSERT INTO SALES.COMPANY (companyname, companydescription) values('Second company', 'Sales oranges');


OK in the next post I will finish this application and provide some additional functionality to edit the company details and add and remove products of a company.

PART 1
PART 2
PART 3