pátek 5. listopadu 2010

CORBA - Java Naming Service, manipulating contexts

This is a short post describing how to implement simple tool to manage CORBA Naming Service.

Corba

The aim of this paragraph is not to describe CORBA, but just to explain little bit how it works, so that later I can explain what is and how works Naming Service - which is part of the CORBA architecture.

So CORBA stands for Common Object Request Broker Architecture. It is a standard which enables programmers to write distributed applications, we can simplify it a lot and say it enables us to write apps working over the network.

Corba is just implementation of standard Server - Client architecture. In Corba's world we create objects on the Server side - and these objects can be used by the clients, which are running on another computers on the network.

The client has to know the structure of the object (the methods and the attributes). The objects which are created on server side and used by the clients are before described by the IDL - interface definition language. The very big advantage of Corba is that if we describe the object by IDL we can later generate Java code as well as C++ code.

When the server creates the object it will put its reference to ORB - Object Request Broker. This is the container that takes care of serialization of object over the network. This is the abstraction layer which permits us to run distributed apps. When the Server submits the object to ORB, it will obtain IOR - string identification of the object reference in ORB.

When the client wants to access the object it will need the IOR. If the server and client meet before they can somehow exchange this info - if not we need to transfer the IOR a different way. Here we will use Naming Service.

Naming Service

Naming Service is a tree structure which allows to store object references of objects which are being managed by the Object Request Broker. Basically that means that the client can now access the object not only by its IOR - but also by a string like name of the object.

Naming Service is a tree structure. There are generally 2 types of nodes - contexts and object references. When a node is a context it can contain several children - this can be again of type context or object. When the client wants an object reference, he needs to now the exact place of the object reference in the tree structure and its name.
There is some valuable information about CORBA Naming Service on this site.

NSAdmin

The tool which I called NSAdmin allows creating or deleting references to objects as well as creating and destroying contexts. The tool can visualise the tree structure using the Java JTree component. Here is how it looks like:

How it works

I wrote NSAdmin in Java and I have used SWING to create the GUI. The program is composed of two classes NSAdminFrame (the GUI) and NSAdmin a static class which actually contains the implementations of the methods. To test the tool you can use the Java implementation of ORB which is a generic part of JDK. To start ORB run:
orbd.exe -ORBInitialPort 1234

The initialisation

In order to work with the Naming Service we have to initialize the Object Request Broker. From the ORB we can obtain the reference to root naming context. This context is always called "NameService". The method for initialization looks like this, if you have started the ORB on your local machine, than the parametrs that you will submit to this method will be: 1234,localhost. Note that the variable rootContext and orb are defined on top of the static class.
public static void init(String port, String initialHost) throws Exception{ 
  String[] args = new String[4]; 
  args[0] = "-ORBInitialPort"; 
  args[1] = port; 
  args[2] = "-ORBInitialHost"; 
  args[3] = initialHost; 
 
  orb = ORB.init(args,null); 
  rootContext = NamingContextExtHelper.narrow(orb.resolve_initial_references("NameService")); 
} 

Exploring the Naming Service tree

To list the content of the naming context we have a method which recursively calls itself. This method will create a tree structure of classes which I called Entry.

Entry is a simple class which has a name and can have multiple childern in its ArrayList entries.
public class Entry {
 public ArrayList entries;
 
 public String name;
 
 public Entry(String n){
  name = n;
  entries = new ArrayList();
 }
}

The structure of Entry classes will be later used to visualise the content in JTree. OK now the method explore which recursivelly traverses the naming context.

public static Entry explore(String contextName,NamingContext context,int treeDepth) throws InvalidName, NotFound, CannotProceed, org.omg.CosNaming.NamingContextPackage.InvalidName{
  
  BindingListHolder blh = new BindingListHolder();
  BindingIteratorHolder bih = new BindingIteratorHolder();
  
  context.list(0,blh, bih);
  
  Entry entry = new Entry(contextName);
  
     System.out.println(contextName); 
  //binding iterator
  BindingIterator bit = bih.value;
  
  boolean remains = true;
  while(remains){
   BindingHolder biholder = new BindingHolder();
   remains = bit.next_one(biholder);
   Binding binding = biholder.value;
   
   NameComponent[] name = binding.binding_name;
   
   
   if(binding.binding_type == BindingType.nobject){
    if(name.length == 1){
     System.out.println("ID: " + name[0].id + " KIND: " + name[0].kind + " Depth: " + treeDepth);
     entry.entries.add(new Entry(name[0].id));
    }
   }else if(binding.binding_type == BindingType.ncontext){
    NamingContext tmpContext =  NamingContextHelper.narrow(context.resolve(binding.binding_name));
    NameComponent component = name[0];
    entry.entries.add(explore(component.id,tmpContext,treeDepth+1));
   }
  }
  return entry;
 }

The methdo takes NamingContext as parametr and will return a structure of Entry classes which will corespond to the naming service tree. There are couple thinks to notice:
The method list(int,BindingListHolder, BindingIteratorHolder) has two ways of usage. The first posibility is to specify how many binding we want to load. If we specify the value, than the bindings will be loaded into the array Binding[] which will be returned in the BindingListHolder class.

The second possibility is to call list(0,blh,bih). This way the BindingListHolder will contain no results and we will obtain an iterator which we can use to iterate through the array. That is the posibility which I chosed.

You can see that I iterate through all the bindings and for each binding I determine the type. If it is a context - than I will recursively explore the context, if the type is object(reference is binded) than I will just add new Entry which will represent this reference.

Destroying and Creating a subcontext

Creating the context is quite straight forward.
public static void createContext(String name) throws org.omg.CosNaming.NamingContextPackage.InvalidName, NotFound, CannotProceed, AlreadyBound{
  
  NameComponent[] contextName = rootContext.to_name(name);
  NamingContext newContext = rootContext.new_context();
  rootContext.bind_context(contextName,newContext);
 }
Destroying context can be a bit tricker because in order to destroy a context, the context has to be empty. So I implemented a recursive method, which will destroy all the children of context and than the context can be destroyed.

public static void deleteContext(String name) throws org.omg.CosNaming.NamingContextPackage.InvalidName, NotFound, CannotProceed, NotEmpty{
  NameComponent[] contextName = rootContext.to_name(name);
  NamingContext context = NamingContextHelper.narrow(rootContext.resolve(contextName));
  
  BindingListHolder blh = new BindingListHolder();
  BindingIteratorHolder bih = new BindingIteratorHolder();
  context.list(Integer.MAX_VALUE, blh, bih);
  
  for(Binding binding:blh.value){
   NameComponent[] componentName = binding.binding_name;
   if(binding.binding_type == BindingType.ncontext){
    NSAdmin.deleteContext(name + "/" + componentName[0].id);
   }
   else{
    NSAdmin.deleteObjectReference(name + "/" + componentName[0].id);
   }
  }
  
  context.destroy();
  rootContext.unbind(contextName);
 }

Creating object reference

This last method is a method to manually add object reference to a context. Let say that an object was created on the server and we have the IOR - the Interoperable Object Reference - which is a identificator of the object. Well than we can bind the reference of the object to the tree and a client application can use just the name to obtain the reference.

public static void createObjectReference(String ior,String context,String objectName) 
 throws org.omg.CosNaming.NamingContextPackage.InvalidName, NotFound, CannotProceed, AlreadyBound{
  org.omg.CORBA.Object reference=orb.string_to_object(ior);
  NameComponent[] componentName = rootContext.to_name(context + objectName);
  rootContext.bind(componentName,reference);
 }
To obtain the reference of the object we just call the method string_to_object of Object Request Broker. The actual binding is than performed as for any other object we want to bind in the tree.
Summary

This is just a light overview of the functions which are the core of the program. Of course there is a bit of glue code to put it together and let it work with the GUI. I thinks you can easily understand the rest from the code itself.

pátek 15. října 2010

RSA implementation using GMP library

Right now I am studying in Paris in one of the engineering schools here and one of my last assignements of cryptography was to implement the RSA in C. To achieve this and to allow manipulation of big integers I have used GMP library which is an open source library for arithmetics.

One part of the assignement was also an implementation of Miller - Rabin primarity test and implementation of Right - to - left binary method to perform Modular exponentiation. These two algorithms are already implemented in GMP so if you just want to implement RSA you can use my source code and modify it so it will use the functions from GMP instead of my implementations.

You can download the source code here.
If you speak french you can also download my poor-french-written report.

čtvrtek 29. července 2010

J2EE - NetBeans, JSF, Persistence API - Part 3

This blog entry is a continuation of a series in which I try to show how I taught myself the basics of J2EE. You can see the first part and following second part.
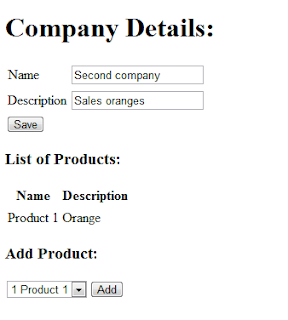
The aim of this part is to extend the detail page of a company by adding a list of products of the company and a drop down list box, which will allow a user to add a new product to the list of the products of the company. Here is who it should look like in the end.

Generally adding the list of the products of the company to the page will be a piece of cake. You can again use the dataTable component provided by JSF. What will be a bit tricky is adding a drop down list. We will use the selectOnListBox component populated by List. Because this component allows to show String value and as I seed we will put in Product class. We will have to use a Converter component which will translate the Product to a single String and vice versa.

Changes to the Session Bean


Again here I will start with the changes in the lower level. We will need to add a method which will provide all the products in the database as a List object. Later we will populate a drop down list with these products.
public List<product> getAllProducts() {
 List<product> products = em.createNamedQuery("Product.getAllProducts").getResultList();
return products;
}

This method is calling a named query which you need to place above the "Product" class declaration.
@Entity
@NamedQuery(name="Product.getAllProducts",query="SELECT p FROM Product p")
public class Product implements Serializable {

}

Then we will need a method which will find a product for a given ID. We can easily use u method of the Entity Manager which allows to find o object by a given ID (the ID field is decorated as a identity in the Entity Beans declaration. This method will be used by the Converter class.
public Product getProductWithId(String id) {
try {
  return em.find(Product.class, Integer.parseInt(id));
} catch (java.lang.NumberFormatException e) {
  e.printStackTrace();
}
return null;
}

The converter class


As it had been said already, we will implement class which allows us convert object of type Product to a String. This class has to implement Converter interface, provided by the JSF framework. This interface has two methods which have to be overriden getAsObject and getAsString. Both of these methods do have 3 arguments.

The FacesContext specifies the context of the current request. FacesContext is an object which takes care of all the phases needed to render a response to the request. When an user demands an page, the users request is first processed by the Faces Servlet. If the call is a postback of previously viewed page, Faces Servlet will use the ID of the view and will look up the FacesContext of the page. If it is a initial view of the page, new FacesContext will be created. FacesContext connects the Component Tree of your page with the Backing Bean containing the logic. To get more information about the JSF life cycle and the FacesContext visit this series.. Now the second argument is the UI Component to which the Converter is connected and the 3rd argument is either String value or Object - depends which way are you currently converting. Now - you just have to implement these method, you will probably never call them in your code. Here is my ProductConverter class which I decided to put into package sales.util.
public class ProductConverter implements Converter{
public Object getAsObject(FacesContext context, UIComponent component, String value) {
SalesSessionLocal ssb = lookupSessionBean();
Product p = ssb.getProductWithId(value);
return p;
}

public String getAsString(FacesContext context, UIComponent component, Object value) {
String id = String.valueOf(((Product)value).getId());
return id;
}

private SalesSessionLocal lookupSessionBean(){
try{
Context c = new InitialContext();
SalesSessionLocal ssb = (SalesSessionLocal) c.lookup("java:comp/env/SalesSessionBean");
return ssb;
}catch(NamingException ex){
return null;
}
}
}

The conversion of the object to the String is quite easy - you just need to decide what describes the object. Here you can see that I just return the products ID.
The conversion of an String to object is the processing of looking up the product of given ID in our Entity Manager. We had prepared a method for this lookup in the Sesion Bean, which we are basically calling by the following line.
Product p = ssb.getProductWithId(value);

Now the question is how to obtain the Session Bean. Normally in the Backing Bean we are using the EJB injection by the "@EJB" decoration. This means that we just write one single line and we obtain the Session Bean (no initialization, the framework takes care of this).
@EJB
SalesSessionLocal ssl;

However in the Converter you are not able to use this approach. The injection is allowed just in Managed Beans (another name for Backing Beans). The solution here is the usage of JNDI Lookup. JNDI - in general is a standard JAVA interface of locating users, computers but also objects and services. We need to lookup an object, concretely Session Bean, which is a part of the same J2EE application. The details of this lookup can be found here. Generally when the application server is started it creates for each application and InitialContext, which is an object that contains the Name - Object bindings. Using this InitialContext we can obtain the desired object if we know the name the object. We give the name to the object (Sesstion Bean) when we register it in the web.xml configuration file. Here is the registration of EJB in web.xml.
<ejb-local-ref>
<ejb-ref-name>SalesSessionBean</ejb-ref-name>
<ejb-ref-type>Session</ejb-ref-type>
<local>sales.SalesSessionLocal</local>
<ejb-link>SalesManagement-ejb.jar#SalesSessionBean</ejb-link>
</ejb-local-ref>

And Here is how we can use the JNDI Lookup to get the Sesstion Bean in our GlassFish InitialContext.
Context c = new InitialContext();
SalesSessionLocal ssb = (SalesSessionLocal) c.lookup("java:comp/env/SalesSessionBean");

Changing Faces Configuration


So that's it, the Convertor class is ready to be used. Now we have to register it in the Faces Configuration; in the faces-config.xml file add the following:
<converter>
<description>Converts Product Entity to String</description>
<converter-id>ProductConverter</converter-id>
<converter-class>sales.util.ProductConverter</converter-class>
</converter>

Changes to the Managed Bean (another name for Backing Bean)


Now we will have to add some methods and fields to the Backing Bean to assure the functionality. First we will need to provide a field (and off course setters and getters) which will store the actual selected "Product" in the drop down list.
private Product selectedProduct;
public Product getSelectedProduct() {
return selectedProduct;
}

public void setSelectedProduct(Product selectedProduct) {
this.selectedProduct = selectedProduct;
}

Now the next method called "addProduct" will just add the "selectedProduct" to the list of products of the current company.
public void addProduct(){
if(this.company.getProducts() == null){
this.company.setProducts(new ArrayList());
}
this.company.getProducts().add(selectedProduct);
ssl.saveCompany(company);
}

The latest method will return a collection of products in as a list of SelectItem, which will represent the collection of products in the drop down list. This method benefits from the previously created method for getting all products in the Session Bean.
public List getAllProductsSelectList() {
List items = new ArrayList();
for (Product p : ssl.getAllProducts()) {
items.add(new SelectItem(p, p.getId() + " " + p.getName()));
}
return items;
}

Using the converter in the web page


Now you should be ready to use to converter in your web page. Open the page with the details of the company ("company.jsp" in my case), and add the following table of products of one company.
<h:datatable value="#{sales.company.products}" var="item">
<h:column>
<f:facet name="header"><h:outputtext value="Name"></h:outputtext></f:facet>
<h:outputtext value="#{item.name}">
</h:outputtext></h:column>
<h:column>
<f:facet name="header"><h:outputtext value="Description"></h:outputtext></f:facet>
<h:outputtext value="#{item.description}">
</h:outputtext></h:column>
</h:datatable>
That is basically the same as done before in part 1, just notices that the table is binded to the list of the products of the "Company" object in Backing Bean. Now the following peace of code actually adds the drop down list box, which allows user to select one product and add it to the company.
<h:outputtext value="Add Product:"></h:outputtext></h3>
<h:selectonelistbox size="1" value="#{sales.selectedProduct}">
<f:selectitems value="#{sales.allProductsSelectList}">
<f:converter converterid="ProductConverter">
</f:converter></f:selectitems></h:selectonelistbox>
<h:commandbutton action="#{sales.addProduct}" id="btnAdd" value="Add">
</h:commandbutton>

You can see that the selectOneListbox component is binded to the "selectedProduct" field defined in the Backing Bean as well as the items list is binded to the list of products in the Backing Bean. The component also contains reference to the converter which should be used, which we have before prepared in the faces-config.xml. If you try this example right now, it will not work, instead you will obtain a strange validation error in your GlassFish log.
To be used by custom JSF converter, the entity class needs to override the Equals method. This is because the selected item is binded to the Backing Bean and when the selected item changes, it is compared to the binded field in the Backing Bean. So now you have to override the equals method for your "Product" class. To distinguish two products you can simply compare their IDs.
@Override
public boolean equals(Object obj){
  if (obj == null) {
    return false;
  }
  if (getClass() != obj.getClass()) {
     return false;
}

final Product other = (Product) obj;
if (this.getId() != other.getId()) {
return false;
}
return true;
}

To try out your example you need some simple testing data. You can run this script (just check the names of the fields in the database tables before).
INSERT INTO SALES.COMPANY (companyname, companydescription) values('First company', 'Sales bananas');
INSERT INTO SALES.COMPANY (companyname, companydescription) values('Second company', 'Sales oranges');

INSERT INTO SALES.PRODUCT (productname,productdescription) values ('Product 1','Orange');
INSERT INTO SALES.PRODUCT (productname,productdescription) values ('Product 2','Banana');
DOWNLOAD THE SOURCE CODE
PART 1
PART 2
PART 3

pátek 16. července 2010

J2EE - NetBeans, JSF, Persistence API - 2nd Part

In the first part I described how to develop a simple page which shows all the "companies" stored in the company table. Now I would like to describe how to add some additional functions - create new company, edit company's details. If you are interested take a look at the first part or directly download the source code.

Class diagram and actual state

Here is our class diagram.

And here the page with some with table containing 2 companies.

What we will add


Now I will add a button to each row of the table, which will direct the page to a site where the user could edit the company details and a second button which will allow creating a new company. Before creating web pages again I will start with defining methods which we will need in Session Beans (the lowest layer) and additional methods and fields in Backing Beans (the middle layer).

New methods in Session Beans


In the Session Bean I will add a method called "saveCompany".
public void saveCompany(Company company) {
company = em.merge(company);
em.persist(company);
}

This method will take an instance of "Company" object and will perform a "merge" of this object with object in Persistence Context. If there is already object distinguished by the same ID in the Persistence Context, than the Entity Manager will update the state of the object in Persistence Context. If there is no such a object than a new one will be created (or lets say the new Company will be added to the Persistence Context. Than by calling the "persist" method of Entity Manager the Company will be stored in the database.

Changes in Backing Bean


Now the Backing Bean will need some more changes. I will add a field of type "Company" which will represent a Company which is actually showed or edited. Than instead of using a basic collection of type List I will use a class called DataModel, which is a part of JSF Framework and allows me to get the row selected by the user in the GUI.
public DataModel companiesModel;
private Company company;
public DataModel getCompaniesModel(){
companiesModel = new ListDataModel(getAllCompanies());
return companiesModel;
}

Now when I have the model I am able to get Company object representing the actually selected row. This is show in method "editCompany".

You see that the method returns String, concretely "edit-company". That string represents a name of a navigation rule which will be used by JSF Framework. Basically it means that the user will be redirected to another page which is specified in the faces-config.xml file. That I will show later. First let me put the last 2 new methods in Backing Bean, one for saving and one for creating a new company. Again the methods return String values for navigation purposes, it will all be clear soon :).
public String saveCompany(){
  ssl.saveCompany(company);
  return "show-companies";
}

public String newCompany(){
  company = new Company();
  return "edit-company";
}

New JSF Page to show Company's details


Lets create a new JSF JSP page (On the Web Module -> New -> JSF JSP) and call it "company.jsp". This page will be used to specify the company details. The code is quite simple:
<h1><h:outputText value="Company Details:"/></h1>
<h:panelGrid columns="2">
<h:outputText value="Name"/>
<h:inputText value="#{sales.company.name}"/>
<h:outputText value="Description"/>
<h:inputText value="#{sales.company.description}"/>
</h:panelGrid>
<h:commandButton id="btnSave" action="#{sales.saveCompany}" value="Save"/>
</h:form>

You see that it uses the h:form tag. This tag is basically later rendered as HTML form tag. This TAG has to be present if your page contains buttons or other components that perform some action. You see that the action of a button is binded to the "saveCompany" method of our Backing Bean and the value of the input fields are binded to the "company" members again in the Backing Bean.

Changes to page containing table of companies


Now lets do some changes to the "companies.jsp" page - the page containing the table of all companies. I will add a "Edit" button to each row (by defining a new column) and in the bottom of the page I will add a "New" button. Both of these buttons will use method previously defined in the Backing Bean.
<h:form>
<h1><h:outputText value="Companies List"/></h1>
<h:dataTable value="#{sales.companiesModel}" var="item">
<h:column>
<f:facet name="header"><h:outputText value="Name"/></f:facet>
<h:outputText value="#{item.name}"/>
</h:column>
<h:column>
<f:facet name="header"><h:outputText value="Description"/></f:facet>
<h:outputText value="#{item.description}"/>
</h:column>
<h:column>
<h:commandButton id="btnEdit" action="#{sales.editCompany}" value="Edit"/>
</h:column>
</h:dataTable>
<h:commandButton id="btnNew" action="#{sales.newCompany}" value="New"/>
</h:form>

Notice, that because there are buttons performing actions I had to surround the whole table by h:form tag.

Changes to faces-config.xml


OK - now we have the pages, last step missing is to explain the navigation rules. As I said before these rules are managed by JSF Framework, and are "called" by returning string expression of our Backing Beans methods (editCompany, saveCompany, newCompany). Open the file "faces-config.xml" and in the upper tab select "Page Flow". You will see a diagram of your pages (there should be 3 of them: companies.jsp, company.jsp, index.jsp). Edit the "Page Flow diagram so it will resemble the following one.

You can change the view to XML and see the XML declaration of these rules (the Page Flow diagram is there just to visualize the navigation rules.
<navigation-rule>
<from-view-id>/companies.jsp</from-view-id>
<navigation-case>
<from-outcome>edit-company</from-outcome>
<to-view-id>/company.jsp</to-view-id>
</navigation-case>
</navigation-rule>
<navigation-rule>
<from-view-id>/company.jsp</from-view-id>
<navigation-case>
<from-outcome>show-companies</from-outcome>
<to-view-id>/companies.jsp</to-view-id>
</navigation-case>
</navigation-rule>

OK now you should be ready to start try out the project. In the "index.jsp" page I added redirect from index page to "companies.jsp" - so you do not have to type the address and it just gets opened after running the project in NetBeans.


PART 1
PART 2
PART 3

středa 14. července 2010

J2EE - NetBeans, JSF, Persistence API

UPDATE:

This is a very old article from the times, when I was very new to Java world. Nowadays I would probably not recomend looking into JSF and J2EE, but it can serve well someone who decided for these technologies and wants to get started.

I spend most of my time with .NET technologies, but I am aware of that J2EE is very powerful and number one technology in the enterprise application world, so I decided that I should learn some basics of J2EE.

You can download the source code here. The source code contains already implemented the changes described in the second part of this post.

This is a simple tutorial on "How to build simple enterprise web application on top of DB" using Java Persistence API, JSF, NetBeans and Derby Database. We will create application that allows the management of "Companies and their Products".

First you will need:


-> NetBeans 6.7.1 + UML tools. I used 6.7.1 because it supported the UML modelling tools with reverse engineer and code generation. The package was not so far ported for the newer versions of NetBeans.
-> J2EE
-> Application server - I used GlassFish 2.1
-> Derby Database (Java DB is SUN's version of this Open Source database)

You can just download the NetBeans Bundle which already includes everything. Just keep in mind that it was tested on the 6.7.1/GlassFish 2.1 version and some setting might not work on the newer versions.

Technologies & Recommended Reading


Java Persistence API - will help us with Object Relational Mapping - it will transfer the Java Objects to the tables in the database.
Entity Bean - represents the object (Company, Product) and its fields (Name, Description) which are later represented as columns in data table.
Session Bean - rather represents all the actions which can be done with the Entity Beans (Create new product, List products of company...)
JSF - web application framework used to speedup an ease the GUI creation. I use the 1.2 version, which is build on top of JSP (a lower layer technology for building dynamic web apps).

Create the projects


In NetBeans select New -> New Project -> Java EE -> Enterprise Application. Later you will be asked to specify Application Server, here you can select the installed GlassFish instance.

In the last tab you can specify the names for the EJB and Web Application Module. That is because NetBeans will create two modules. The EJB module will take care of your "Model and Control", the Web Application Module will take care of the "View".

If you wish to model you Entity Beans with NetBeans UML tool than select New Project -> UML -> Java-Platform Model -> Finish, and later you can create your Class Diagram.

Start with modelling


First we want to create our Entity Beans - objects which represent some real world entities, which will be stored in the database. In our application there are 2: Company and Product. Here is the class diagram which we want to create.


From this diagram we can generate the Entity classes. Right click the UML project -> Generate Code. You should obtain following classes:
public class Company {

private int id;
private String description;
private String name;
private List products;

public Company () {
}

public int getId () {
return id;
}

public void setId (int val) {
id = val;
}

public String getName () {
return name;
}

public void setName (String val) {
name = val;
}

public List getProducts() {
return products;
}

public void setProducts(List products) {
this.products = products;
}

public String getDescription () {
return description;
}

public void setDescription (String val) {
this.description = val;
}
}

public class Product {

private int id;
private String description;
private String name;

public Product () {
}

public String getDescription () {
return description;
}

public void setDescription (String val) {
description = val;
}

public int getId () {
return id;
}

public void setId (int val) {
id = val;
}

public String getName () {
return name;
}

public void setName (String val) {
name = val;
}
}


Also you can write the classes and use the Reverse Engineer to obtain the class diagram.

Creating Entity Beans from classes


To convert the the class to Entity Beans you have to do two simple steps - add annotations and implement the Serializable interface.

public class Company implements Serializable {

@Id
@GeneratedValue(strategy=GenerationType.IDENTITY)
@Column(name="companyID",nullable=false)
private int id;

@Column(name="companyDescription")
private String description;

@Column(name="companyName")
private String name;

@ManyToMany
private List products;

...and all the setters and getter...
}


It is quite self-explanatory. The class has to be annotated as @Entity, and has to have at least one @Id field. Then we can specify the name of the column which will be created in the database, and also strategy for generating the IDs value.

You will notice that there will the NetBeans light bulb telling you that there is no Persistence Unit - now we will create one.


Creating the Persistence Unit


Persistence Unit will perform the object - relational mapping for us. To create one we will first create a database.
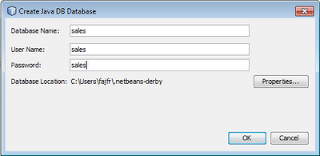
On the "Services" pane localize Databases -> Java DB -> Create Database and specify the demanded details.

Now when we have the Database, we can create Database Connection which will be used by the Persistence Unit to connect to the DB.
Databases -> New Connection.


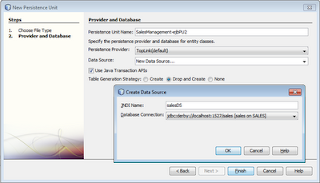
Now go back and right click EJB Module of you application and select New -> Persistence Unit.


Before we continue with Session Beans we will prepare a Named Query. Named queries are static queries which are later compiled to SQL and used by Persistence Unit. We will use a simple queries getting all the companies in the table. We place the query above the class definition.

@Entity
@NamedQuery(
name="Company.getAllCompanies",
query="SELECT c FROM Company c"
)
public class Company implements Serializable {

}


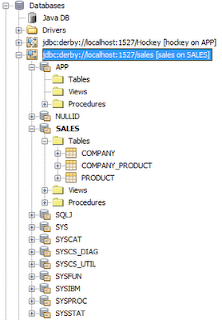
Now that you have finished the Persistance Unit you can try to deploy the project. Of course there is no functionality so far created, but during the deployment the database should be created for you. You can check the resulted database in the Services tab.

Session Beans


Now we will create the Session Bean, which will provide method and actions which we can perform with our Entity Beans.
Go to Enterprise Beans -> New -> Session Bean, than specify the package and leave the standard settings.

You can notice that the newly created Bean implements interface ending with "Local".
Now we will add the first method which will return all the companies in the database. NetBeans tells you how to do this - Context Menu -> Insert Code -> Add Bussiness Method.


The method will be defined in the interface and method stub created in the implementation. Now you can edit the code like this:

@Stateless
public class SalesSessionBean implements SalesSessionLocal {

@PersistenceContext
private EntityManager em;

public List getAllCompanies() {
List companies = em.createNamedQuery("Company.getAllCompanies").getResultList();
return companies;
}
}


Notice that we defined EntityManager which is a class which manages Persistance Context. Persistance Context is basket managing your Entities(objects representing Company, Product...). Classes which are managed by the Entity Manager are our Entity Beans. In the method you can see that we all calling Named Query which we have created before.

Backing Beans


Now we will create a middle layer between the Session Bean and JSP site representing the GUI - this layer is a Backing Bean. Backing bean is a Java class which manages and is accessible from the actual JSP page. Create new class in the Web Module (New -> Java Class) and name it SalesBack. Now here is the implementation:

public class SalesBack {

@EJB
SalesSessionLocal ssl;

public List<company> getAllCompanies(){
return ssl.getAllCompanies();
}
}


You can see that the class basically references the Session Bean (Be careful you have to reference the interface, not the actual implementation). Than in the method we simply calling the method of the Session Bean. From this it seems that this layer is not needed, but actually it is quiet helpful as you will see later.

Faces configuration


In order to be able to use just create Backing Bean in your JSP pages, you will need to perform some changes to faces-config.xml file. Open the file and add the following into the faces-config element:

<managed-bean>
<managed-bean-name>sales</managed-bean-name>
<managed-bean-class>sales.back.SalesBack</managed-bean-class>
<managed-bean-scope>session</managed-bean-scope>
</managed-bean>

Be sure to check the Backing Bean class (including the package name). Later you can reference this Backing Bean as "sales" in your JSP page.

JSF Page


Now we will show what advantages/components brings Java Server Faces and how to use them. First we will create simple page just showing a table of all companies in stored in the DB. On the Web Module create a new JSP page with JSF. (New -> JSF JSP Page). After you create the page you can see that it contains two @taglib directives referencing the JSF framework TAGs.
JSP technology can be extended by "custom tags". When we register the prefixes using the taglib directory, we introduce all the custom tags which come with the JSF framework. First group with prefix "f" named "Core" references all the components which are independent on the renderer (e.g. converters, validators). The second group with prefix "h" named "HTML" introduces all the HTML tags and components that brings JSF to create nice GUI and functional GUI (buttons, tables, grids...).
OK, so now lets put in the code which will show the table of companies.
<h1><h:outputText value="Companies List"/></h1><h:dataTable value="#{sales.allCompanies}" var="item">
<h:column>
<f:facet name="header"><h:outputText value="Name"/></f:facet>
<h:outputText value="#{item.name}"/>
</h:column>
<h:column>
<f:facet name="header"><h:outputText value="Description"/></f:facet>
<h:outputText value="#{item.description}"/>
</h:column>
</h:dataTable>


The main advantage of JSF is that it lets us bind the content of some HTML components to the properties/fields in the Backing Bean. Because in our Backing Bean we had a method called "getAllCompanies" than here we can reference the result of this method as "#{sales.allCompanies}". This binding is done on the "" component by setting the value attribute. Notice that the second attribute var lets you set the "name" for one row of the binded collection. Later in the columns definitions you can address one company in the collection by this name (here "item").

Faces Servlet configuration in web.xml


Ok now that you have created the JSP file is time to try it. Before you will have to tell the application server, that if the user navigates to your page, the page contains Faces elements and has to be processed using the Faces Servlet. Open the web.xml and alter the Faces Servlet settings this way:

<servlet>
<servlet-name>Faces Servlet</servlet-name>
<servlet-class>javax.faces.webapp.FacesServlet</servlet-class>
<load-on-startup>1</load-on-startup>
</servlet>
<servlet-mapping>
<servlet-name>Faces Servlet</servlet-name>
<url-pattern>*.jsf</url-pattern>
</servlet-mapping>


Important part is the Mapping configuration. Basically you are saying that each file ending jsf will be processed by the Faces Servlet. Now if the name of the file you created was "companies.jsp", than in the browser you will reference it by "companies.jsf". Now run the project, and in the browser type the path to "companies.jsf" and you should get following result.


Obviously the companies table is empty. So go ahead and using NetBeans (Services -> Databases) run some SQL INSERT statements and you should be able to see the inserted data in your table.

INSERT INTO SALES.COMPANY (companyname, companydescription) values('First company', 'Sales bananas');
INSERT INTO SALES.COMPANY (companyname, companydescription) values('Second company', 'Sales oranges');


OK in the next post I will finish this application and provide some additional functionality to edit the company details and add and remove products of a company.

PART 1
PART 2
PART 3

pondělí 21. června 2010

Shrew VPN Client Windows 7 - 64 bit

Like many other people on the internet I had to use Cisco VPN Client to connect to our network. First Cisco didn't support 64 bit, now they do support, but I am unable to install the 64bit client. I get this error during the installation:

Installation ended prematurely because of an error.

Well I am using Shrew VPN Client which is freeware and allows to import the Cisco Client pcf configuration files.

After the import and first try to connect it ended up just with "bringing up tunnel ...".
I had to make one more manual step: Uncheck and Check again the Shrew Soft Lightweight Filter on the connection properties tab. (Configure the connection which connects you to internet).


After that everything worked ok for me.

pátek 14. května 2010

Submit entire InfoPath form to web service

This post explains on a simple example how to submit the entire XML of the InfoPath form to a Web Service and process it.

During my last assignment, I needed to submit the content of Repeating Table of InfoPath form to Access Database.
The form had to be published on SharePoint Site - so I could not submit directly to the database, but I was forced to use the web service (because web enabled forms do not allow access directly to the database)

So I build a web service method which allowed me to submit one row of the Repeating Table to the database and I thought that I would be able to submit each row in some kind of a loop inside the InfoPath form. Well it did not work, I was just able to submit the first row all the time and nothing more.

So I decided to submit "the entire form" and than parse it on the web service side. Here is a short example of how to do this.

Preparing the InfoPath form


First let's create simple InfoPath form with one repeating table (eg. list of products)


Now what you have to do is rename the fields in the "Data sources" tab. Later you will use these names of the fields to get the values stored XML representing the InfoPath form.


Creating the Web Service


In the web service you will need a method which takes XmlDocument and will parse this XML document representing the InfoPath form and store it's values to the database.

[WebMethod]
public void SubmitDocument(XmlDocument doc)
{           
XmlNamespaceManager nsManager = new XmlNamespaceManager(doc.NameTable); 
nsManager .AddNamespace(formNamespace, formURI);
nsManager .AddNamespace("dfs",
"http://schemas.microsoft.com/office/infopath/2003/dataFormSolution");

XmlNode root = doc.DocumentElement;
XmlNodeList list = root.SelectNodes("/dfs:IPDocument/my:myFields/my:prodList/my:product", nsManager);

foreach (XmlNode node in list)
{
string name = node.SelectSingleNode("/dfs:IPDocument/my:myFields/my:prodList/my:product/my:name", nsManager).InnerText;
string price = node.SelectSingleNode("/dfs:IPDocument/my:myFields/my:prodList/my:product/my:price", nsManager).InnerText;
string amount = node.SelectSingleNode("/dfs:IPDocument/my:myFields/my:prodList/my:product/my:amount", nsManager).InnerText;

SubmitToDataBase(name,price, amount);
}
}


In this method first we initialize the XMLNamespaceManager. To this manager we will have to add 2 namespace. First one is the namespace of the data source of the InfoPath document. This one we can find out in InfoPath client by navigating to Properties -> Details.

Now when InfoPath submits the form to the Web Service, it adds another namespace to the document marked as: dfs with the url http://schemas.microsoft.com/office/infopath/2003/dataFormSolution" and you need to add the namespace to your namespace manager.

nsManager .AddNamespace("dfs", "http://schemas.microsoft.com/office/infopath/2003/dataFormSolution");


Then to get value of certain field in the XmlDocument we need to know the XPath which leads directly to the desired XmlNode. We can get the XPath by the Copy XPath option, which can be found in the context menu of desired field in the "Data Sources" tab in your InfoPath client.

For example to get the "amount" XmlNode and later the string representing a number inside this node we can use the following code:

XmlNode nAmount = node.SelectSingleNode("/dfs:IPDocument/my:myFields/my:prodList/my:product/my:amount", nsManager);

int amount = Convert.ToInt32(nAmount.InnerText);
Now in the following part I will just show a simple example of method which would store some data to the Access database.

Preparing the Accesss database connection


To connect to Access database you can use the OLE DB Provider, exactly the .NET Framework OLE DB provider, in the namespace System.Data.OleDB. First you need to specify the connection string to your database. Because we are using web service it is good idea to store it in the Web.config file. Add the following to the Web.config file.


Later, already in the code of your Web Service you can prepare yourself a property which will provide you this connection string (just not to write too long lines of code).
public String ConStr
{
get { return ConfigurationManager.ConnectionStrings["myDB"].ConnectionString; }
}

The following is a simple implementation of a method which stores the data in the database. You can made this method part of your Web Service directly or build yourself some data access class.
public void SubmitToDataBase(String name, String price, String amount)
{
OleDbConnection con = new OleDbConnection(ConStr);

String cmd = "INSERT INTO products(name,price,amount)values(?,?,?)";
OleDbCommand command = new OleDbCommand(cmd, con);

OleDbParameter pName = new OleDbParameter();
pName.Value = name;
command.Parameters.Add(pName);

OleDbParameter pPrice = new OleDbParameter();
pPrice.Value = Convert.ToInt32(price);
command.Parameters.Add(pName);

OleDbParameter pAmount = new OleDbParameter();
pAmount.Value = Convert.ToInt32(amount);
command.Parameters.Add(pAmount);

con.Open();
command.ExecuteNonQuery();
con.Close();

}

There is nothing too interesting here if you are familiar with some other ADO classes. Just notice that I am using parametrized queries. The SQL command contains question marks, which are later when the actual OleDbCommand substituted with provided parameters.
That is all about the Web Service now you need to go back and configure the InfoPath form to connect to the Web Service.

Connecting the InfoPath form to the Web Service


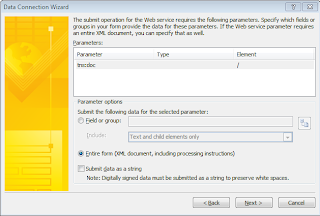
OK now lets go back to the InfoPath form design. To submit the document to this web service you will have to add new data source select submit data -> to Web Service. Than localize you web service and find the method that, you just created and than finally in the Data Connection Wizard select submit Entire form.


Now just to give you a complete idea, here is the XML which is submitted to the web service. However if the document is saved as XML later (eg. in the SharePoint document library), the dfs namespace is not presented.

<dfs:IPDocument xmlns:dfs="http://schemas.microsoft.com/office/infopath/2003/dataFormSolution"><?mso-infoPathSolution solutionVersion="1.0.0.4" productVersion="12.0.0" PIVersion="1.0.0.0" href="file:///C:\Users\fajfr\AppData\Local\Microsoft\InfoPath\Designer2\23fae1f325544a92\manifest.xsf" ?><?mso-application progid="InfoPath.Document" versionProgid="InfoPath.Document.2"?>
<my:myFields xmlns:my="http://schemas.microsoft.com/office/infopath/2003/myXSD/2010-05-18T07:21:28" xml:lang="en-us">
<my:prodList>
<my:product>
<my:name />
<my:price xsi:nil="true" xmlns:xsi="http://www.w3.org/2001/XMLSchema-instance" />
<my:amout xsi:nil="true" xmlns:xsi="http://www.w3.org/2001/XMLSchema-instance" />
</my:product>
</my:prodList>
</my:myFields>
</dfs:IPDocument>

pondělí 3. května 2010

SharePoint and InfoPath - Error while processing the form and Schema validation error

Lately I came across these 2 following errors:

Error 1 - There has been an error while processing the form. There is an unclosed literal string

If you will come across this issue try one of following solutions(or combination):

1) You have some secondary data sources in the form which are not used. If you need them there (maybe they get use only on click of button...) than just drag and drop this data source to form and hide it.

2) Check the names of secondary data sources for special characters ( 'ěšřž...')

3) There is a KB fix which might help:

http://support.microsoft.com/kb/949752

Error 2 - Schema validation found non-data type errors

There is a solution from MS for this issue, when you are editing InfoPath form CODE:

http://blogs.msdn.com/infopath/archive/2006/11/28/the-xsi-nil-attribute.aspx

However in my case helped just setting the PreserveWhiteSpaces property to TRUE on XmlDocument:


XmlDocument lDoc = new XmlDocument();
...
lDoc.PreserveWhitespace = true;
lDoc.Save(myOutStream);

neděle 2. května 2010

Vehicle Routing Problem

One of my school assignments this semester was to implement some of the algorithms which solve the Vehicle Routing Problem.

UPDATE: I have moved the source code to GitHub. Get it or fork the project.

In VRP you have a depot and a set of customers. You have a fleet of vehicles which can serve this customers. Each customer can have an exact demand on quantity of goods and each vehicle can have capacity which is able to serve. This is easily modeled as Graph Theory Problem. The problem is NP hard. However there are several algorithms described for this problem (heuristics,genetics). To know more about variants and different solutions check this source.

I decided to implement Clarks & Wrights and Sweep algorithm. I build my solution in JAVA but later I decided that it would be cool to have some way to visualize the results. Then I decided to use GWT-MAPS API to visualize real world problems. Soon I wanted also to visualize the random generated graph problems so I included the GWT-INCUBATOR API to show some small graphs.

Check the program here

Basic functions

  • Compute the routes using Clark & Wright or Sweep algorithm
  • Generate random VRP - including distance matrix, node positions and demands of each node
  • Compute distance matrix from real world data using Google MAPS API

Basic usage
The input for this utility to compute the vehicle rows has to be specified as follows:

[route count]
[distance matrix]
[customer demand;address;x coordinate;y coordinate]


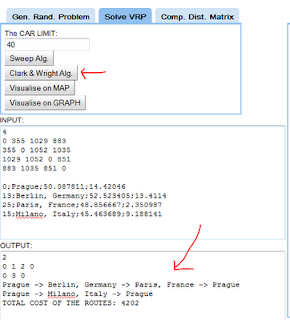
After loading the site you can see example problem of 3 customers. You can run Clark & Wright or Sweep algorithm and you will obtained the routes of the VRP in the OUTPUT window. Before running the algorithm you should set the capacity of the vehicles - in this situation all the vehicles have the same capacity. The output has the following format:

[number of routes]
[depo city1 city2 ... cityN depo]
...
[depo->city1->city2 ... cityN->depo]
...


You can visualize the output either on Graph or on MAP - if you working with real world cities and addresses than you visualize on map. If you are working just with sample data the you can visualize on the graph.


Generating distance matrix for real world cities
To generate the distance for several cities for which you know only the addresses u will enter in the INPUT box on each line one city and then click on "Generate distance matrix". Also you can see that on the MAP tab all the routes network connecting all the cities has been visualized:

image


Now you need to modify the input - more specifically modify the amounts of goods requested by each city. The DEPOT is always in the first city, so there the demand would be zero. Let's say your customer in Milano wants 15 units, in Paris 20 units and in Prague 13 units.


Now again you can just run the desired algorithm and view the results. For example after running the Clark & Wright algorithm you should get the following output:


Now you can visualize these routes in the MAP.


Generating and visualizing random problem
To generate random GRAPH VPR Problem you have to specify:

- Number of nodes.
- Constant by which the random value(0-1) would be multiplied to obtain desired amount for each city.
- Constant by which the random value(0-1) would be multiplied to obtain random coordinates of the city.

After you will obtain the desired INPUT.


Now you can run one of the algorithms(eg. SWEEP) and you will obtain the OUTPUT - the routes of the vehicle.


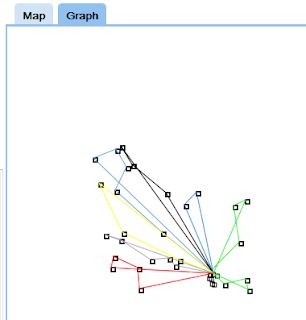
Now because this is randomly generated problem it is good to visualize it in the GRAPH:


THE ISSUES
The clear method of the canvas to visualize the points is not working fine - generating new VRP problem will not erase the points of the old VRP problem. The main issue is that this application uses the GWT Canvas, which was a part of GWT incubator. It also uses the Google Maps binding for GWT.

Since I have wrote the application there have been several changes in the situation about GWT and plugins:

  • Canvas is now part of the GWT 3. So theoretically the application could be rewritten using GWT 3.
  • Google Maps are now in version 2. However the GWT binding for Maps v3 has not yet been released – there are however some open-source initiatives.

So  what to do now? I have kept the code as it is: using maps v2 and the ancient Canvas project. If anyone feels motivated for moving the application to GWT 3 (changing Canvas and Maps binding) just fork it away on GitHub.

About the source code

On GitHub you can currently download two packages:

  • Java-only package. That is a basic library and executable program which can solve the VRP without the visualization.
  • GWT packages. Contains the classes which perform the VRP solving and the visualization using GWT.

The classes from the Java-only package are copied to the GWT project. That is because they have to be presented at compile time – the classes cannot be included as a JAR file. If anyone knows how to reuse a code in GWT projects without doubling it – let me know.

The  code is of a very poor quality. At time when I have wrote it I simply did not care about the readability and also I did not know Java that well.

pondělí 19. dubna 2010

Office 2007 Crash - wwlib.dll - error code: c0000005

Recently I had to resolve this issue:

Office 2007 Crash
wwlib.dll
code error: c0000005
OS: Windows 7

It started with Word and then with Outlook. I found the solution here:

http://www.edbott.com/weblog/?p=1771
KB Article: http://support.microsoft.com/default.aspx?scid=kb;en-us;940791

If you are lazy to read, the solution is removing this registry entry:
HKEY_CURRENT_USER\Software\Microsoft\Office\12.0\Word\Data

pátek 19. března 2010

Errors during ./configure

I was trying to compile Midnight-Commander from source and get it to run. I downloaded the source files using GIT and than went to the project folder and run the ./configure script. Because it was on my newly installed OpenSuse machine I run into following errors and solved them by installing required components:

maint/autopoint: line 421: /usr/share/gettext/archive.tar.gz: No such file or directory
tar: This does not look like a tar archive
tar: Exiting with failure status due to previous errors
cvs checkout: cannot find module `archive' - ignored
find: `archive': No such file or directory
autopoint: *** infrastructure files for version 0.14.3 not found; this is autopoint from GNU gettext-tools 0.17
autopoint: *** Stop.

-> install gettext-tools

./autogen.sh: line 55: aclocal: command not found

-> install autogen & automake

./autogen.sh: line 48: libtoolize: command not found

-> install libtool

checking for GLIB... no
configure: error: glib-2.0 not found or version too old (must be >= 2.8)

-> install glib2-devel

checking for slang/slang.h... no
configure: error: Slang header not found

-> Install slang and slang-devel

After that I was able to run MAKE and the run the compiled project.

čtvrtek 11. března 2010

System.IO.PathTooLongException while opening InfoPath forms in SharePoint

When opening a InfoPath form in SharePoint, you may get int he ULS log the following exception:

Unhandled exception when rendering form System.IO.PathTooLongException:
The specified file or folder name is too long. The URL path for all files and folders must be 260 characters or less (and no more than 128 characters for any single file or folder name in the URL). Please type a shorter file or folder name.

Some general info about the exception can be found here.

It is caused by the MSO-INFOPATHSOLUTION directive in the head of the xml definition of the form. The attribute HREF of this directive can not exceed the size of 260 characters.

Our InfoPath forms where designed as InfoPath 2003 forms, and the HREF attribute was really long:


but if you strip it down, you can see that a simple link to the file is enough.


href="http://intranet/teamwebs/informatics/Evidence%20poadavk%20WF/Forms/template.xsn"


The forms designed in InfoPath 2007 do not generate the href attribute that long. Also note if you just want the forms to open in the client application(InfoPath), you can set this on the advanced settings of the Document Library, in which the forms are contained. But even there, if there would be link to the file outside of this library, or if you will access the direct link, SharePoint will always try to open it in Web Browser.

This forum post had led me to the solution:
http://www.k2underground.com/forums/p/8709/26302.aspx#26302

pondělí 8. března 2010

WSS Tracing Service stoped - how to get the LOG info?

Sometimes in the SharePoint LOG, you can get the following information and nothing else:

Service lost trace events.

This happens when the Windows SharePoint Tracing Service is halted or not working. Usually you can just restart the service, but sometimes it won't work. The you can try to run TaskManager and end the process called "wsstracing.exe".

If that is not going to work you can restart the Internet Information Server or the whole Server.

But sometimes it is not possible - in the production department when you need the information of some actual error.

In this situation I use great tool called SPTraceView. This tool will attach itself as online listener to the SharePoint ULS and will capture the errors and messages for you. You can just run it and there is no need to restart the server or IIS.

sobota 6. března 2010

Which Linux install in Virtual PC on Windows 7

Because I needed Linux for some school projects regarding opensource development I have decided to install it as Virtual Machine to Virtual PC.

First advice - Linux guests are officially not supported for MS Windows Virtual PC, if you really don't need it don't do it.

Second advice - Virtual PC supports hosting 64bit operating systems (but as Linux is not supported only Windows) - but in some cases I found that I was able to run only 32 bit version (OpenSuse, Fedora).

What I have tried so far
------------------------

Ubuntu 9.10 - installation ok, but ater "Segmentation fault". After increasing memory amount from 800Mb to 1024Mb the os started, but the performance was REALLY slow. Here is a possible workaround which I didn't tested.

Fedora 12
  • version i686. I was not able to boot the disk. The screen just blanked at went of.
  • version i386. The installation started but after selecting "Install or upgrade" the virtual machine went off.
  • version x86_64. this version told me, that I can not use 64bit os on 32bit platform (I'am on 64 bits)

Debian 5.04 - Version i386 net install - after starting the installation the virtual pc went off.

OpenSuse
  • version x86_64 - this version told me, that I can not use 64bit os on 32bit platform (I'am on 64 bits)
  • Version i586 installed fine, but after the "1st configuration" did not finish and system did not boot up correctly.

Mandriva 2010 - version i586 - the installation did not start correctly

Slackware 13 - installation ok, it works now, but so far in the textmode.

UPDATE: ok now it works fine with GNOME.

4 basic steps:

1) Install GNOME version for Slackware.
2) Run xorgsetup to configure the XSERVER
3) Run xwmconfig to configure which X manager do you want to use - select GNOME.
4) Run xinit to start X Server

To Install KDE you just need to add the KDEBASE packages (eg. from GNOME start the package management tool).

If you want to use bigger resolution than 800x600(which is default), than you will have to modify your xorg.conf file, details can be found here:
http://demiliani.com/blog/archive/2004/03/18/1808.aspx


Summary
OK - I was able to get Ubuntu tu run - but realllly slow. Slackware is so far working without a problem.

pondělí 8. února 2010

Owner activity of CorrelationToken

In approval workflow it is quite common to give the approver possibility to ask for additional information. When I develop sequential workflow I am modeling it the way this picture shows.


In other words first task "managementApproveTask" is creted and when the manager ask for additional information then "addManagementInfoTask" is created. Whene the person adds the information the big WHILE returns and creates new task for the manager to approve the document - this gives the manager the possibility to ask for additional information as many times as he wants and ask different people and so on...

Well then the question is which activity set as the owner of CorrelationToken of the CreateTask activity and also of OnTaskChanged activity - because they are always the same.

If you set the "ManagementApproveActivity" or any other activity PARENT TO THE WHILE loop as the owner of the CorrelationToken, you will get the following error:

System.InvalidOperationException: Correlation value on declaration "TOKEN NAME" is already initialized.
at System.Workflow.Runtime.CorrelationToken.Initialize(Activity activity, ICollection`1 propertyValues)
at System.Workflow.Activities.CorrelationService.InvalidateCorrelationToken(Activity activity, Type interfaceType, String methodName, Object[] messageArgs)...


The problem is as the exception says that the Correlation Token is already initialized. To resolve this you have to set as Owner activity of the CorrelationToken any activity inside the WHILE loop. Then any time the while loop is entered the activities inside are recreated, that means that there will be also new CorrelationToken created for each new task.

neděle 7. února 2010

TargetInvocationException when using CreateTaskWithContentType activity

If you want to use ASP.NET pages with your workflow in SharePoint you need to follow these steps:

1) Create the web page.
2) Create ContentType containing your WebPage.
3) Add the ContentType to the ContentTypes gallery in SharePoint site.
4) Allow ContentTypes on the SharePoint task list, where the task of your workflow will be stored.
5) Add the ContentType to the list where your workflow tasks will be stored.
6) Finally you can use CreteTaskWithContentType activity and specify the GUID of the ContentType which you have created.

For more details of how to develop SharePoint workflows with ASP.NET pages refer to this blog.

If you do not add the ContentType to the gallery or if you forgot to add it to the SharePoint list, you can receive the following exception:

System.Reflection.TargetInvocationException: Exception has been thrown by the target of an invocation. ---> System.NullReferenceException: Object reference not set to an instance of an object. at Microsoft.SharePoint.Workflow.SPWinOETaskService.CreateTaskWithContentTypeInternal(Guid taskId, SPWorkflowTaskProperties properties, Boolean useDefaultContentType, SPContentTypeId ctid, HybridDictionary specialPermissions) at Microsoft.SharePoint.Workflow.SPWinOETaskService.CreateTaskWithContentType(Guid taskId, SPWorkflowTaskProperties properties, String taskContentTypeId, HybridDictionary specialPermissions)


The best way to add the ContentType to the ContentTypes library is to create Feature containing all your ContentTypes and install and activate the feature on SharePoint. On details pleas follow the part 4 of the above mention blog how-to.

Programatically allow and add ContentTypes on SharePoint list


Here is a method which I am using to programatically alow and add ContentTypes on SharePoint task list, which accepts String representing the GUID of the ContentType and SPList representing the task list.

I've found the code in this method again in part 4 of this great series.


public static void AllowContentType(SPList lTaskList, String lTaskContentType)
{

//make shure that the content types are enabled on the task list
if (lTaskList.ContentTypesEnabled != true)
{
//if not allow them. This can be done also in the SharePoint GUI
lTaskList.ContentTypesEnabled = true;
}

// convert given String representing the GUID to SPContentTypeId
SPContentTypeId myContentTypeID = new SPContentTypeId(lTaskContentType);

// Find the content type in SharePoint site content types library
SPContentType myContentType = lTaskList.ParentWeb.Site.RootWeb.ContentTypes[myContentTypeID];

//if the content type was found
if (myContentType != null)
{

// Check if the content type was already added to the SharePoint task list
bool contenTypeExists = false;
foreach (SPContentType contentType in lTaskList.ContentTypes)
{
if (contentType.Name == myContentType.Name)
{
// This content type was already added
contenTypeExists = true;
break;
}
}

// If I didn't find this content type in the list I will have to add it
if (contenTypeExists != true)
{
lTaskList.ContentTypes.Add(myContentType);
}
}
else
{
throw new Exception("Content type is not register with the web site");
}
}

neděle 3. ledna 2010

SharePoint - Exception from HRESULT: 0x80020009 (DISP_E_EXCEPTION)

In one of my WebParts I was using this little piece of code to get the current user from SharePoint:

//values I wanted to work with
String name, email;

//get the currnet SPWeb
//THE PROBLEM: You should not dispose after calling GetContextWeb Method
using (SPWeb lWeb = SPControl.GetContextWeb(this.Context))
{
SPUser lUser = lWeb.CurrentUser;
name = lUser.Name;
email = lUser.Email;
}

after executing this I've got the folowing exception:

(Exception from HRESULT: 0x80020009 (DISP_E_EXCEPTION))
Description: An unhandled exception occurred during the execution of the current web request. Please review the stack trace for more information about the error and where it originated in the code.
Exception Details: Microsoft.SharePoint.WebPartPages.WebPartPageUserException: Došlo k výjimce. (Exception from HRESULT: 0x80020009 (DISP_E_EXCEPTION))
Source Error:
An unhandled exception was generated during the execution of the current web request. Information regarding the origin and location of the exception can be identified using the exception stack trace below.

I have googled a bit and found the solution:

//get the currnet user
SPUser lUser = SPContext.Current.Web.CurrentUser;
//work with it as you need
name = lUser.Name;
email = lUser.Email;

In the MSDN Best Practices you can find, that when using the SPControl.GetContextWeb() or SPControl.GetContextSite() method you should not dispose the created objects.