čtvrtek 29. července 2010

J2EE - NetBeans, JSF, Persistence API - Part 3

This blog entry is a continuation of a series in which I try to show how I taught myself the basics of J2EE. You can see the first part and following second part.
The aim of this part is to extend the detail page of a company by adding a list of products of the company and a drop down list box, which will allow a user to add a new product to the list of the products of the company. Here is who it should look like in the end.
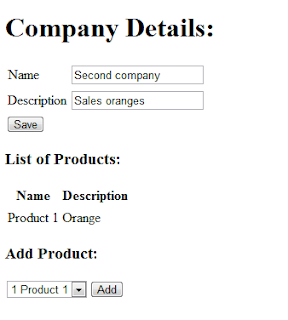
Generally adding the list of the products of the company to the page will be a piece of cake. You can again use the dataTable component provided by JSF. What will be a bit tricky is adding a drop down list. We will use the selectOnListBox component populated by List. Because this component allows to show String value and as I seed we will put in Product class. We will have to use a Converter component which will translate the Product to a single String and vice versa.

Changes to the Session Bean


Again here I will start with the changes in the lower level. We will need to add a method which will provide all the products in the database as a List object. Later we will populate a drop down list with these products.
public List<product> getAllProducts() {
 List<product> products = em.createNamedQuery("Product.getAllProducts").getResultList();
return products;
}

This method is calling a named query which you need to place above the "Product" class declaration.
@Entity
@NamedQuery(name="Product.getAllProducts",query="SELECT p FROM Product p")
public class Product implements Serializable {

}

Then we will need a method which will find a product for a given ID. We can easily use u method of the Entity Manager which allows to find o object by a given ID (the ID field is decorated as a identity in the Entity Beans declaration. This method will be used by the Converter class.
public Product getProductWithId(String id) {
try {
  return em.find(Product.class, Integer.parseInt(id));
} catch (java.lang.NumberFormatException e) {
  e.printStackTrace();
}
return null;
}

The converter class


As it had been said already, we will implement class which allows us convert object of type Product to a String. This class has to implement Converter interface, provided by the JSF framework. This interface has two methods which have to be overriden getAsObject and getAsString. Both of these methods do have 3 arguments.

The FacesContext specifies the context of the current request. FacesContext is an object which takes care of all the phases needed to render a response to the request. When an user demands an page, the users request is first processed by the Faces Servlet. If the call is a postback of previously viewed page, Faces Servlet will use the ID of the view and will look up the FacesContext of the page. If it is a initial view of the page, new FacesContext will be created. FacesContext connects the Component Tree of your page with the Backing Bean containing the logic. To get more information about the JSF life cycle and the FacesContext visit this series.. Now the second argument is the UI Component to which the Converter is connected and the 3rd argument is either String value or Object - depends which way are you currently converting. Now - you just have to implement these method, you will probably never call them in your code. Here is my ProductConverter class which I decided to put into package sales.util.
public class ProductConverter implements Converter{
public Object getAsObject(FacesContext context, UIComponent component, String value) {
SalesSessionLocal ssb = lookupSessionBean();
Product p = ssb.getProductWithId(value);
return p;
}

public String getAsString(FacesContext context, UIComponent component, Object value) {
String id = String.valueOf(((Product)value).getId());
return id;
}

private SalesSessionLocal lookupSessionBean(){
try{
Context c = new InitialContext();
SalesSessionLocal ssb = (SalesSessionLocal) c.lookup("java:comp/env/SalesSessionBean");
return ssb;
}catch(NamingException ex){
return null;
}
}
}

The conversion of the object to the String is quite easy - you just need to decide what describes the object. Here you can see that I just return the products ID.
The conversion of an String to object is the processing of looking up the product of given ID in our Entity Manager. We had prepared a method for this lookup in the Sesion Bean, which we are basically calling by the following line.
Product p = ssb.getProductWithId(value);

Now the question is how to obtain the Session Bean. Normally in the Backing Bean we are using the EJB injection by the "@EJB" decoration. This means that we just write one single line and we obtain the Session Bean (no initialization, the framework takes care of this).
@EJB
SalesSessionLocal ssl;

However in the Converter you are not able to use this approach. The injection is allowed just in Managed Beans (another name for Backing Beans). The solution here is the usage of JNDI Lookup. JNDI - in general is a standard JAVA interface of locating users, computers but also objects and services. We need to lookup an object, concretely Session Bean, which is a part of the same J2EE application. The details of this lookup can be found here. Generally when the application server is started it creates for each application and InitialContext, which is an object that contains the Name - Object bindings. Using this InitialContext we can obtain the desired object if we know the name the object. We give the name to the object (Sesstion Bean) when we register it in the web.xml configuration file. Here is the registration of EJB in web.xml.
<ejb-local-ref>
<ejb-ref-name>SalesSessionBean</ejb-ref-name>
<ejb-ref-type>Session</ejb-ref-type>
<local>sales.SalesSessionLocal</local>
<ejb-link>SalesManagement-ejb.jar#SalesSessionBean</ejb-link>
</ejb-local-ref>

And Here is how we can use the JNDI Lookup to get the Sesstion Bean in our GlassFish InitialContext.
Context c = new InitialContext();
SalesSessionLocal ssb = (SalesSessionLocal) c.lookup("java:comp/env/SalesSessionBean");

Changing Faces Configuration


So that's it, the Convertor class is ready to be used. Now we have to register it in the Faces Configuration; in the faces-config.xml file add the following:
<converter>
<description>Converts Product Entity to String</description>
<converter-id>ProductConverter</converter-id>
<converter-class>sales.util.ProductConverter</converter-class>
</converter>

Changes to the Managed Bean (another name for Backing Bean)


Now we will have to add some methods and fields to the Backing Bean to assure the functionality. First we will need to provide a field (and off course setters and getters) which will store the actual selected "Product" in the drop down list.
private Product selectedProduct;
public Product getSelectedProduct() {
return selectedProduct;
}

public void setSelectedProduct(Product selectedProduct) {
this.selectedProduct = selectedProduct;
}

Now the next method called "addProduct" will just add the "selectedProduct" to the list of products of the current company.
public void addProduct(){
if(this.company.getProducts() == null){
this.company.setProducts(new ArrayList());
}
this.company.getProducts().add(selectedProduct);
ssl.saveCompany(company);
}

The latest method will return a collection of products in as a list of SelectItem, which will represent the collection of products in the drop down list. This method benefits from the previously created method for getting all products in the Session Bean.
public List getAllProductsSelectList() {
List items = new ArrayList();
for (Product p : ssl.getAllProducts()) {
items.add(new SelectItem(p, p.getId() + " " + p.getName()));
}
return items;
}

Using the converter in the web page


Now you should be ready to use to converter in your web page. Open the page with the details of the company ("company.jsp" in my case), and add the following table of products of one company.
<h:datatable value="#{sales.company.products}" var="item">
<h:column>
<f:facet name="header"><h:outputtext value="Name"></h:outputtext></f:facet>
<h:outputtext value="#{item.name}">
</h:outputtext></h:column>
<h:column>
<f:facet name="header"><h:outputtext value="Description"></h:outputtext></f:facet>
<h:outputtext value="#{item.description}">
</h:outputtext></h:column>
</h:datatable>
That is basically the same as done before in part 1, just notices that the table is binded to the list of the products of the "Company" object in Backing Bean. Now the following peace of code actually adds the drop down list box, which allows user to select one product and add it to the company.
<h:outputtext value="Add Product:"></h:outputtext></h3>
<h:selectonelistbox size="1" value="#{sales.selectedProduct}">
<f:selectitems value="#{sales.allProductsSelectList}">
<f:converter converterid="ProductConverter">
</f:converter></f:selectitems></h:selectonelistbox>
<h:commandbutton action="#{sales.addProduct}" id="btnAdd" value="Add">
</h:commandbutton>

You can see that the selectOneListbox component is binded to the "selectedProduct" field defined in the Backing Bean as well as the items list is binded to the list of products in the Backing Bean. The component also contains reference to the converter which should be used, which we have before prepared in the faces-config.xml. If you try this example right now, it will not work, instead you will obtain a strange validation error in your GlassFish log.
To be used by custom JSF converter, the entity class needs to override the Equals method. This is because the selected item is binded to the Backing Bean and when the selected item changes, it is compared to the binded field in the Backing Bean. So now you have to override the equals method for your "Product" class. To distinguish two products you can simply compare their IDs.
@Override
public boolean equals(Object obj){
  if (obj == null) {
    return false;
  }
  if (getClass() != obj.getClass()) {
     return false;
}

final Product other = (Product) obj;
if (this.getId() != other.getId()) {
return false;
}
return true;
}

To try out your example you need some simple testing data. You can run this script (just check the names of the fields in the database tables before).
INSERT INTO SALES.COMPANY (companyname, companydescription) values('First company', 'Sales bananas');
INSERT INTO SALES.COMPANY (companyname, companydescription) values('Second company', 'Sales oranges');

INSERT INTO SALES.PRODUCT (productname,productdescription) values ('Product 1','Orange');
INSERT INTO SALES.PRODUCT (productname,productdescription) values ('Product 2','Banana');
DOWNLOAD THE SOURCE CODE
PART 1
PART 2
PART 3

pátek 16. července 2010

J2EE - NetBeans, JSF, Persistence API - 2nd Part

In the first part I described how to develop a simple page which shows all the "companies" stored in the company table. Now I would like to describe how to add some additional functions - create new company, edit company's details. If you are interested take a look at the first part or directly download the source code.

Class diagram and actual state

Here is our class diagram.

And here the page with some with table containing 2 companies.

What we will add


Now I will add a button to each row of the table, which will direct the page to a site where the user could edit the company details and a second button which will allow creating a new company. Before creating web pages again I will start with defining methods which we will need in Session Beans (the lowest layer) and additional methods and fields in Backing Beans (the middle layer).

New methods in Session Beans


In the Session Bean I will add a method called "saveCompany".
public void saveCompany(Company company) {
company = em.merge(company);
em.persist(company);
}

This method will take an instance of "Company" object and will perform a "merge" of this object with object in Persistence Context. If there is already object distinguished by the same ID in the Persistence Context, than the Entity Manager will update the state of the object in Persistence Context. If there is no such a object than a new one will be created (or lets say the new Company will be added to the Persistence Context. Than by calling the "persist" method of Entity Manager the Company will be stored in the database.

Changes in Backing Bean


Now the Backing Bean will need some more changes. I will add a field of type "Company" which will represent a Company which is actually showed or edited. Than instead of using a basic collection of type List I will use a class called DataModel, which is a part of JSF Framework and allows me to get the row selected by the user in the GUI.
public DataModel companiesModel;
private Company company;
public DataModel getCompaniesModel(){
companiesModel = new ListDataModel(getAllCompanies());
return companiesModel;
}

Now when I have the model I am able to get Company object representing the actually selected row. This is show in method "editCompany".

You see that the method returns String, concretely "edit-company". That string represents a name of a navigation rule which will be used by JSF Framework. Basically it means that the user will be redirected to another page which is specified in the faces-config.xml file. That I will show later. First let me put the last 2 new methods in Backing Bean, one for saving and one for creating a new company. Again the methods return String values for navigation purposes, it will all be clear soon :).
public String saveCompany(){
  ssl.saveCompany(company);
  return "show-companies";
}

public String newCompany(){
  company = new Company();
  return "edit-company";
}

New JSF Page to show Company's details


Lets create a new JSF JSP page (On the Web Module -> New -> JSF JSP) and call it "company.jsp". This page will be used to specify the company details. The code is quite simple:
<h1><h:outputText value="Company Details:"/></h1>
<h:panelGrid columns="2">
<h:outputText value="Name"/>
<h:inputText value="#{sales.company.name}"/>
<h:outputText value="Description"/>
<h:inputText value="#{sales.company.description}"/>
</h:panelGrid>
<h:commandButton id="btnSave" action="#{sales.saveCompany}" value="Save"/>
</h:form>

You see that it uses the h:form tag. This tag is basically later rendered as HTML form tag. This TAG has to be present if your page contains buttons or other components that perform some action. You see that the action of a button is binded to the "saveCompany" method of our Backing Bean and the value of the input fields are binded to the "company" members again in the Backing Bean.

Changes to page containing table of companies


Now lets do some changes to the "companies.jsp" page - the page containing the table of all companies. I will add a "Edit" button to each row (by defining a new column) and in the bottom of the page I will add a "New" button. Both of these buttons will use method previously defined in the Backing Bean.
<h:form>
<h1><h:outputText value="Companies List"/></h1>
<h:dataTable value="#{sales.companiesModel}" var="item">
<h:column>
<f:facet name="header"><h:outputText value="Name"/></f:facet>
<h:outputText value="#{item.name}"/>
</h:column>
<h:column>
<f:facet name="header"><h:outputText value="Description"/></f:facet>
<h:outputText value="#{item.description}"/>
</h:column>
<h:column>
<h:commandButton id="btnEdit" action="#{sales.editCompany}" value="Edit"/>
</h:column>
</h:dataTable>
<h:commandButton id="btnNew" action="#{sales.newCompany}" value="New"/>
</h:form>

Notice, that because there are buttons performing actions I had to surround the whole table by h:form tag.

Changes to faces-config.xml


OK - now we have the pages, last step missing is to explain the navigation rules. As I said before these rules are managed by JSF Framework, and are "called" by returning string expression of our Backing Beans methods (editCompany, saveCompany, newCompany). Open the file "faces-config.xml" and in the upper tab select "Page Flow". You will see a diagram of your pages (there should be 3 of them: companies.jsp, company.jsp, index.jsp). Edit the "Page Flow diagram so it will resemble the following one.

You can change the view to XML and see the XML declaration of these rules (the Page Flow diagram is there just to visualize the navigation rules.
<navigation-rule>
<from-view-id>/companies.jsp</from-view-id>
<navigation-case>
<from-outcome>edit-company</from-outcome>
<to-view-id>/company.jsp</to-view-id>
</navigation-case>
</navigation-rule>
<navigation-rule>
<from-view-id>/company.jsp</from-view-id>
<navigation-case>
<from-outcome>show-companies</from-outcome>
<to-view-id>/companies.jsp</to-view-id>
</navigation-case>
</navigation-rule>

OK now you should be ready to start try out the project. In the "index.jsp" page I added redirect from index page to "companies.jsp" - so you do not have to type the address and it just gets opened after running the project in NetBeans.


PART 1
PART 2
PART 3

středa 14. července 2010

J2EE - NetBeans, JSF, Persistence API

UPDATE:

This is a very old article from the times, when I was very new to Java world. Nowadays I would probably not recomend looking into JSF and J2EE, but it can serve well someone who decided for these technologies and wants to get started.

I spend most of my time with .NET technologies, but I am aware of that J2EE is very powerful and number one technology in the enterprise application world, so I decided that I should learn some basics of J2EE.

You can download the source code here. The source code contains already implemented the changes described in the second part of this post.

This is a simple tutorial on "How to build simple enterprise web application on top of DB" using Java Persistence API, JSF, NetBeans and Derby Database. We will create application that allows the management of "Companies and their Products".

First you will need:


-> NetBeans 6.7.1 + UML tools. I used 6.7.1 because it supported the UML modelling tools with reverse engineer and code generation. The package was not so far ported for the newer versions of NetBeans.
-> J2EE
-> Application server - I used GlassFish 2.1
-> Derby Database (Java DB is SUN's version of this Open Source database)

You can just download the NetBeans Bundle which already includes everything. Just keep in mind that it was tested on the 6.7.1/GlassFish 2.1 version and some setting might not work on the newer versions.

Technologies & Recommended Reading


Java Persistence API - will help us with Object Relational Mapping - it will transfer the Java Objects to the tables in the database.
Entity Bean - represents the object (Company, Product) and its fields (Name, Description) which are later represented as columns in data table.
Session Bean - rather represents all the actions which can be done with the Entity Beans (Create new product, List products of company...)
JSF - web application framework used to speedup an ease the GUI creation. I use the 1.2 version, which is build on top of JSP (a lower layer technology for building dynamic web apps).

Create the projects


In NetBeans select New -> New Project -> Java EE -> Enterprise Application. Later you will be asked to specify Application Server, here you can select the installed GlassFish instance.

In the last tab you can specify the names for the EJB and Web Application Module. That is because NetBeans will create two modules. The EJB module will take care of your "Model and Control", the Web Application Module will take care of the "View".

If you wish to model you Entity Beans with NetBeans UML tool than select New Project -> UML -> Java-Platform Model -> Finish, and later you can create your Class Diagram.

Start with modelling


First we want to create our Entity Beans - objects which represent some real world entities, which will be stored in the database. In our application there are 2: Company and Product. Here is the class diagram which we want to create.


From this diagram we can generate the Entity classes. Right click the UML project -> Generate Code. You should obtain following classes:
public class Company {

private int id;
private String description;
private String name;
private List products;

public Company () {
}

public int getId () {
return id;
}

public void setId (int val) {
id = val;
}

public String getName () {
return name;
}

public void setName (String val) {
name = val;
}

public List getProducts() {
return products;
}

public void setProducts(List products) {
this.products = products;
}

public String getDescription () {
return description;
}

public void setDescription (String val) {
this.description = val;
}
}

public class Product {

private int id;
private String description;
private String name;

public Product () {
}

public String getDescription () {
return description;
}

public void setDescription (String val) {
description = val;
}

public int getId () {
return id;
}

public void setId (int val) {
id = val;
}

public String getName () {
return name;
}

public void setName (String val) {
name = val;
}
}


Also you can write the classes and use the Reverse Engineer to obtain the class diagram.

Creating Entity Beans from classes


To convert the the class to Entity Beans you have to do two simple steps - add annotations and implement the Serializable interface.

public class Company implements Serializable {

@Id
@GeneratedValue(strategy=GenerationType.IDENTITY)
@Column(name="companyID",nullable=false)
private int id;

@Column(name="companyDescription")
private String description;

@Column(name="companyName")
private String name;

@ManyToMany
private List products;

...and all the setters and getter...
}


It is quite self-explanatory. The class has to be annotated as @Entity, and has to have at least one @Id field. Then we can specify the name of the column which will be created in the database, and also strategy for generating the IDs value.

You will notice that there will the NetBeans light bulb telling you that there is no Persistence Unit - now we will create one.


Creating the Persistence Unit


Persistence Unit will perform the object - relational mapping for us. To create one we will first create a database.
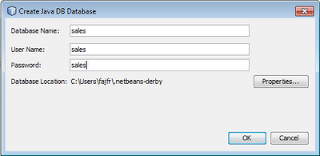
On the "Services" pane localize Databases -> Java DB -> Create Database and specify the demanded details.

Now when we have the Database, we can create Database Connection which will be used by the Persistence Unit to connect to the DB.
Databases -> New Connection.


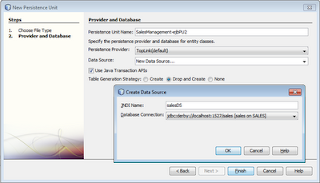
Now go back and right click EJB Module of you application and select New -> Persistence Unit.


Before we continue with Session Beans we will prepare a Named Query. Named queries are static queries which are later compiled to SQL and used by Persistence Unit. We will use a simple queries getting all the companies in the table. We place the query above the class definition.

@Entity
@NamedQuery(
name="Company.getAllCompanies",
query="SELECT c FROM Company c"
)
public class Company implements Serializable {

}


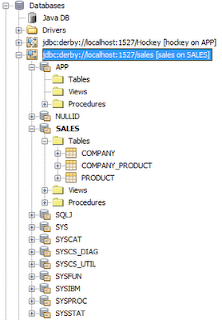
Now that you have finished the Persistance Unit you can try to deploy the project. Of course there is no functionality so far created, but during the deployment the database should be created for you. You can check the resulted database in the Services tab.

Session Beans


Now we will create the Session Bean, which will provide method and actions which we can perform with our Entity Beans.
Go to Enterprise Beans -> New -> Session Bean, than specify the package and leave the standard settings.

You can notice that the newly created Bean implements interface ending with "Local".
Now we will add the first method which will return all the companies in the database. NetBeans tells you how to do this - Context Menu -> Insert Code -> Add Bussiness Method.


The method will be defined in the interface and method stub created in the implementation. Now you can edit the code like this:

@Stateless
public class SalesSessionBean implements SalesSessionLocal {

@PersistenceContext
private EntityManager em;

public List getAllCompanies() {
List companies = em.createNamedQuery("Company.getAllCompanies").getResultList();
return companies;
}
}


Notice that we defined EntityManager which is a class which manages Persistance Context. Persistance Context is basket managing your Entities(objects representing Company, Product...). Classes which are managed by the Entity Manager are our Entity Beans. In the method you can see that we all calling Named Query which we have created before.

Backing Beans


Now we will create a middle layer between the Session Bean and JSP site representing the GUI - this layer is a Backing Bean. Backing bean is a Java class which manages and is accessible from the actual JSP page. Create new class in the Web Module (New -> Java Class) and name it SalesBack. Now here is the implementation:

public class SalesBack {

@EJB
SalesSessionLocal ssl;

public List<company> getAllCompanies(){
return ssl.getAllCompanies();
}
}


You can see that the class basically references the Session Bean (Be careful you have to reference the interface, not the actual implementation). Than in the method we simply calling the method of the Session Bean. From this it seems that this layer is not needed, but actually it is quiet helpful as you will see later.

Faces configuration


In order to be able to use just create Backing Bean in your JSP pages, you will need to perform some changes to faces-config.xml file. Open the file and add the following into the faces-config element:

<managed-bean>
<managed-bean-name>sales</managed-bean-name>
<managed-bean-class>sales.back.SalesBack</managed-bean-class>
<managed-bean-scope>session</managed-bean-scope>
</managed-bean>

Be sure to check the Backing Bean class (including the package name). Later you can reference this Backing Bean as "sales" in your JSP page.

JSF Page


Now we will show what advantages/components brings Java Server Faces and how to use them. First we will create simple page just showing a table of all companies in stored in the DB. On the Web Module create a new JSP page with JSF. (New -> JSF JSP Page). After you create the page you can see that it contains two @taglib directives referencing the JSF framework TAGs.
JSP technology can be extended by "custom tags". When we register the prefixes using the taglib directory, we introduce all the custom tags which come with the JSF framework. First group with prefix "f" named "Core" references all the components which are independent on the renderer (e.g. converters, validators). The second group with prefix "h" named "HTML" introduces all the HTML tags and components that brings JSF to create nice GUI and functional GUI (buttons, tables, grids...).
OK, so now lets put in the code which will show the table of companies.
<h1><h:outputText value="Companies List"/></h1><h:dataTable value="#{sales.allCompanies}" var="item">
<h:column>
<f:facet name="header"><h:outputText value="Name"/></f:facet>
<h:outputText value="#{item.name}"/>
</h:column>
<h:column>
<f:facet name="header"><h:outputText value="Description"/></f:facet>
<h:outputText value="#{item.description}"/>
</h:column>
</h:dataTable>


The main advantage of JSF is that it lets us bind the content of some HTML components to the properties/fields in the Backing Bean. Because in our Backing Bean we had a method called "getAllCompanies" than here we can reference the result of this method as "#{sales.allCompanies}". This binding is done on the "" component by setting the value attribute. Notice that the second attribute var lets you set the "name" for one row of the binded collection. Later in the columns definitions you can address one company in the collection by this name (here "item").

Faces Servlet configuration in web.xml


Ok now that you have created the JSP file is time to try it. Before you will have to tell the application server, that if the user navigates to your page, the page contains Faces elements and has to be processed using the Faces Servlet. Open the web.xml and alter the Faces Servlet settings this way:

<servlet>
<servlet-name>Faces Servlet</servlet-name>
<servlet-class>javax.faces.webapp.FacesServlet</servlet-class>
<load-on-startup>1</load-on-startup>
</servlet>
<servlet-mapping>
<servlet-name>Faces Servlet</servlet-name>
<url-pattern>*.jsf</url-pattern>
</servlet-mapping>


Important part is the Mapping configuration. Basically you are saying that each file ending jsf will be processed by the Faces Servlet. Now if the name of the file you created was "companies.jsp", than in the browser you will reference it by "companies.jsf". Now run the project, and in the browser type the path to "companies.jsf" and you should get following result.


Obviously the companies table is empty. So go ahead and using NetBeans (Services -> Databases) run some SQL INSERT statements and you should be able to see the inserted data in your table.

INSERT INTO SALES.COMPANY (companyname, companydescription) values('First company', 'Sales bananas');
INSERT INTO SALES.COMPANY (companyname, companydescription) values('Second company', 'Sales oranges');


OK in the next post I will finish this application and provide some additional functionality to edit the company details and add and remove products of a company.

PART 1
PART 2
PART 3